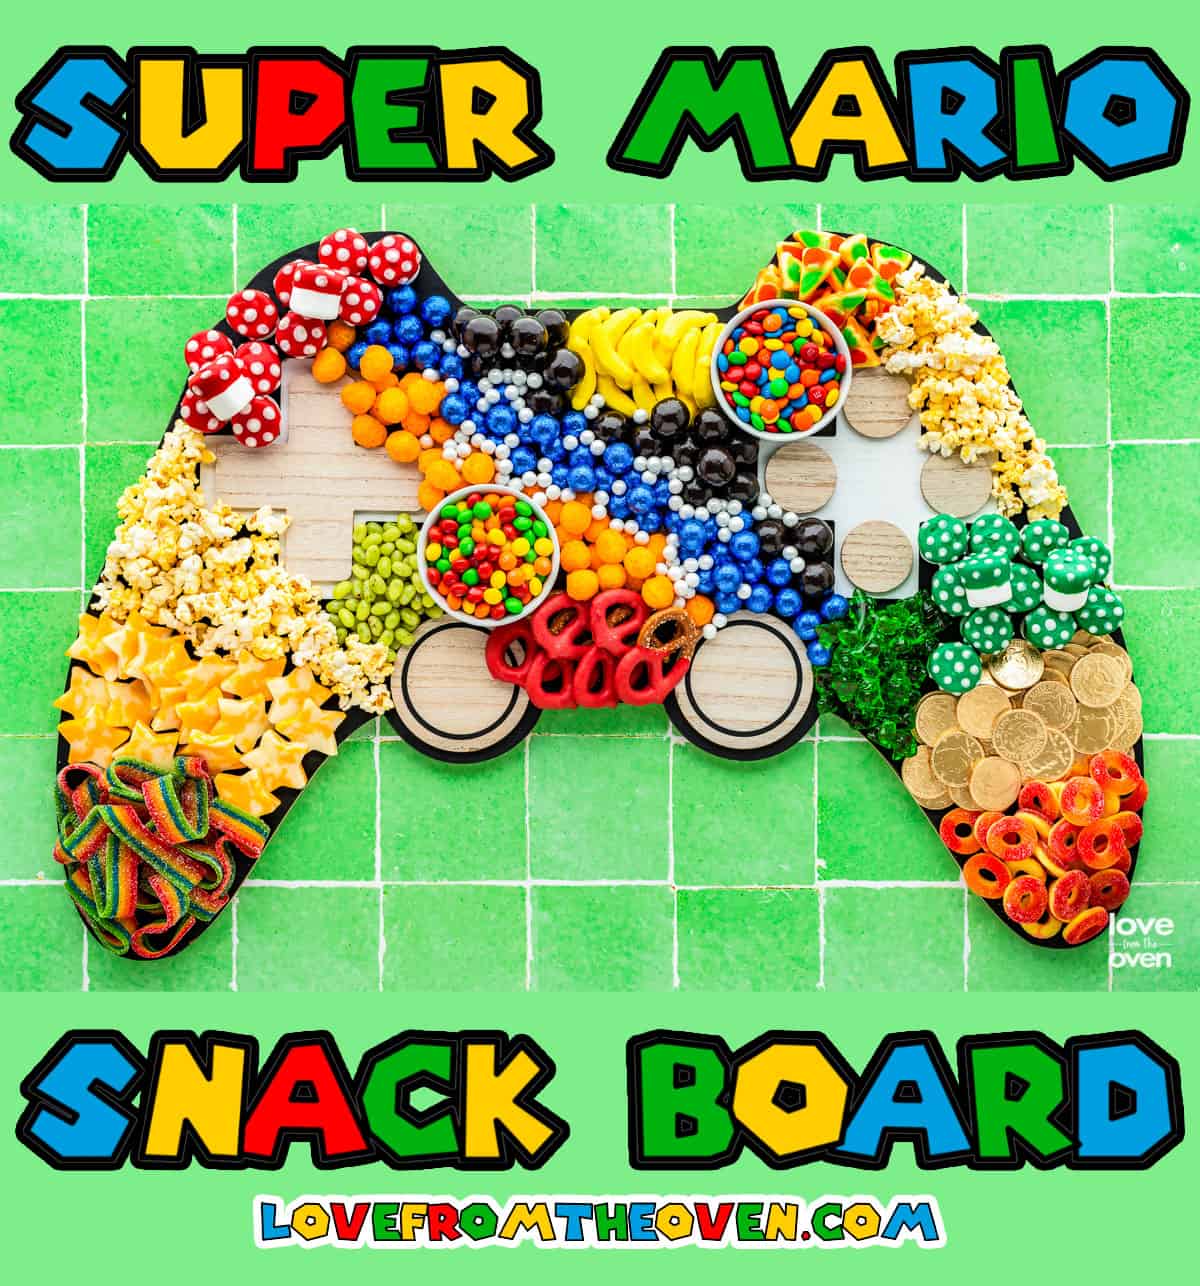
This Super Mario Party Snack Board is a SUPER fantastic way to serve your guests some colorful, themed snacks while you watch the new Super Mario Bros. Movie! You can quite literally have a ‘Super Mario Party’ and make this ‘TOAD-ally’ adorable Super Mario Movie inspired charcuterie board. Oh yeah!
Follow along with these expert tips and tricks to learn how to assemble this ‘Supa Koopa’ cool snack board that everyone will rave about for years to come! Wahoo!
Reasons You’ll Love This
Wowser Bowser! – Seriously, how COOL is this snack board? You’ll never hear the end of the compliments after making this.
Easy ‘Peach-y’ – You’ll be shocked at how simple this board is to assemble. It will look like it took you years, when really it only takes a small chunk of your time to get everything together.
It’s a Me! I Did That. – The accomplishment you’ll feel after making this is reason enough to try your hand at making this.
The Bob-omb – This board IS the bomb.com. It’s playful, colorful, and so much fun to eat!
Cheat Codes – Finding what you need won’t be a game, because everything you need is listed and linked up below!
This could be the perfect platter for a Super Mario birthday party, or just any kind of birthday party, really. You can also switch up the colors and flavors to make it your own. I hope this recipe inspires you to get creative, and make a snack board that will wow your crowd!
Are you ready to level up your snack game?
Let’s-a go! It’s Mario Time!
Ingredient Info
Really, the ingredients you put on this snack board are entirely up to you. You can follow my suggestions to a ‘T’ or you can substitute for snacks you see fit!
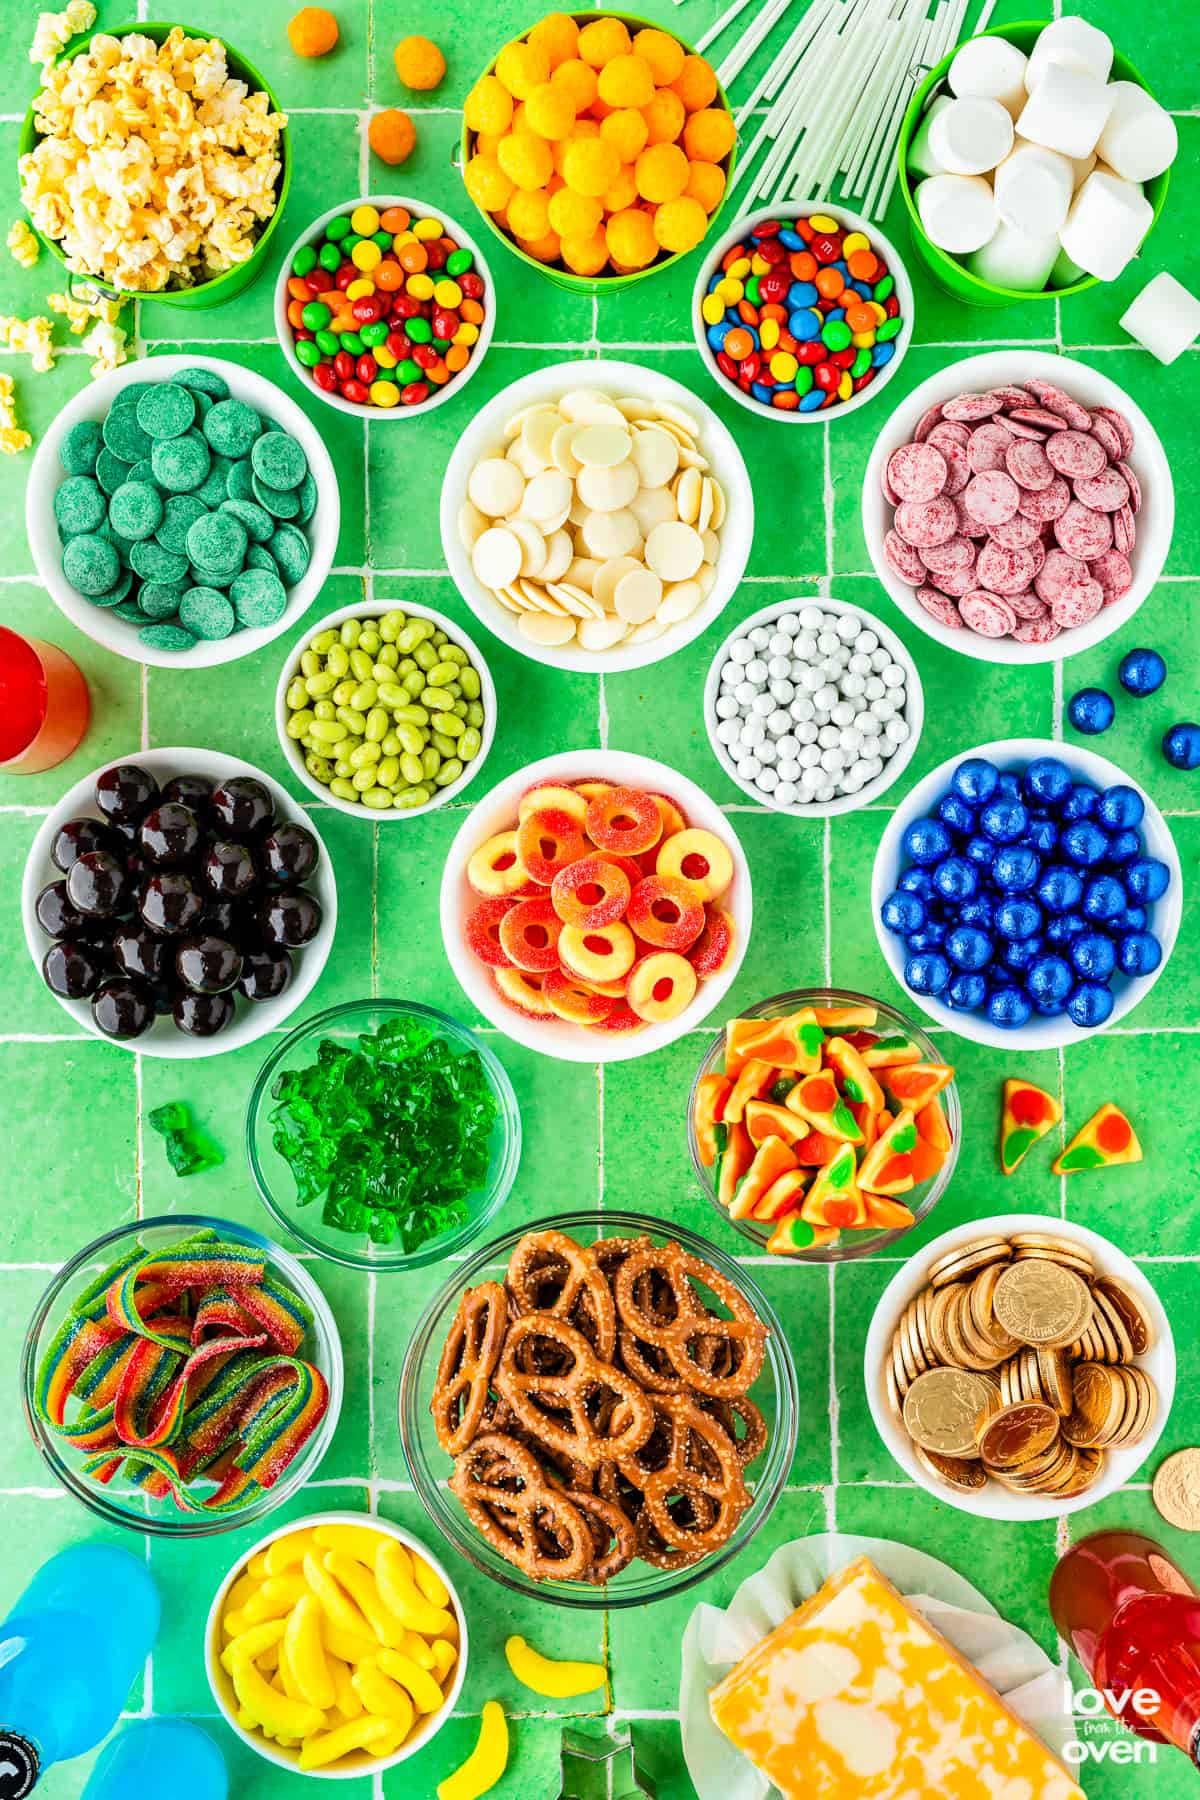
Below is a compiled list of the things you see on the Super Mario Party Snack Board! Highly recommend buying specific specialty candy online, or checking your local party store. If you have a store that sells bulk candy in your area, that is also a great place to find just the right amounts of what you need.
Snack Board Ingredients
- Popcorn
- Cheddar Cheese Balls
- Skittles
- M&Ms
- Green Juicy Pear Jelly Beans
- Peach Rings
- Blue Foil Wrapped Chocolate Balls
- Dark Chocolate Malt Balls
- Small White Sixlets
- 3D Gummy Dinosaurs
- Gummy Pizza Slices
- Sour Rainbow Belts
- Chocolate Gold Coins
- Gummy Banana Candy
- Sourdough Hard Pretzels
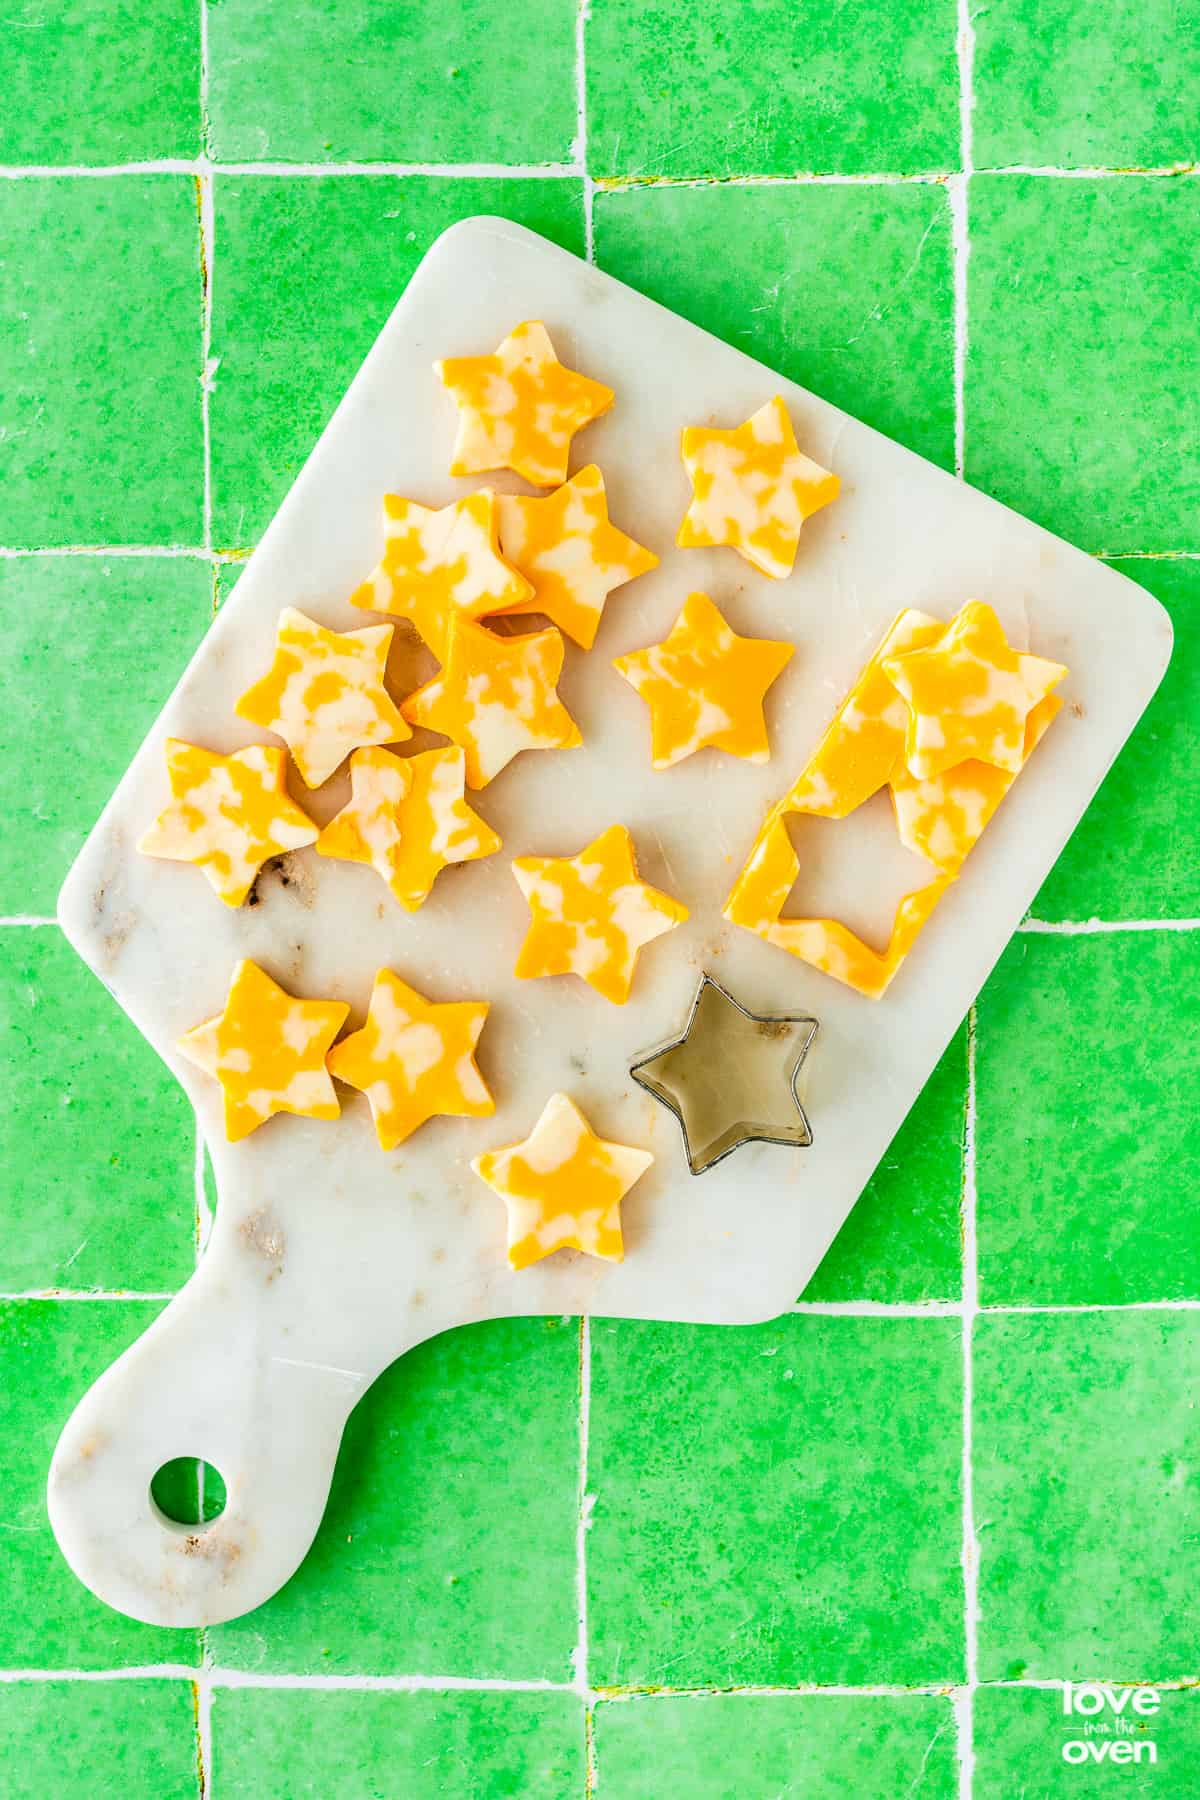
- Colby Jack Cheese (cut into stars using a small star shaped cookie cutter)
- If you don’t want to use cheese, Gold Wrapped Stars are great
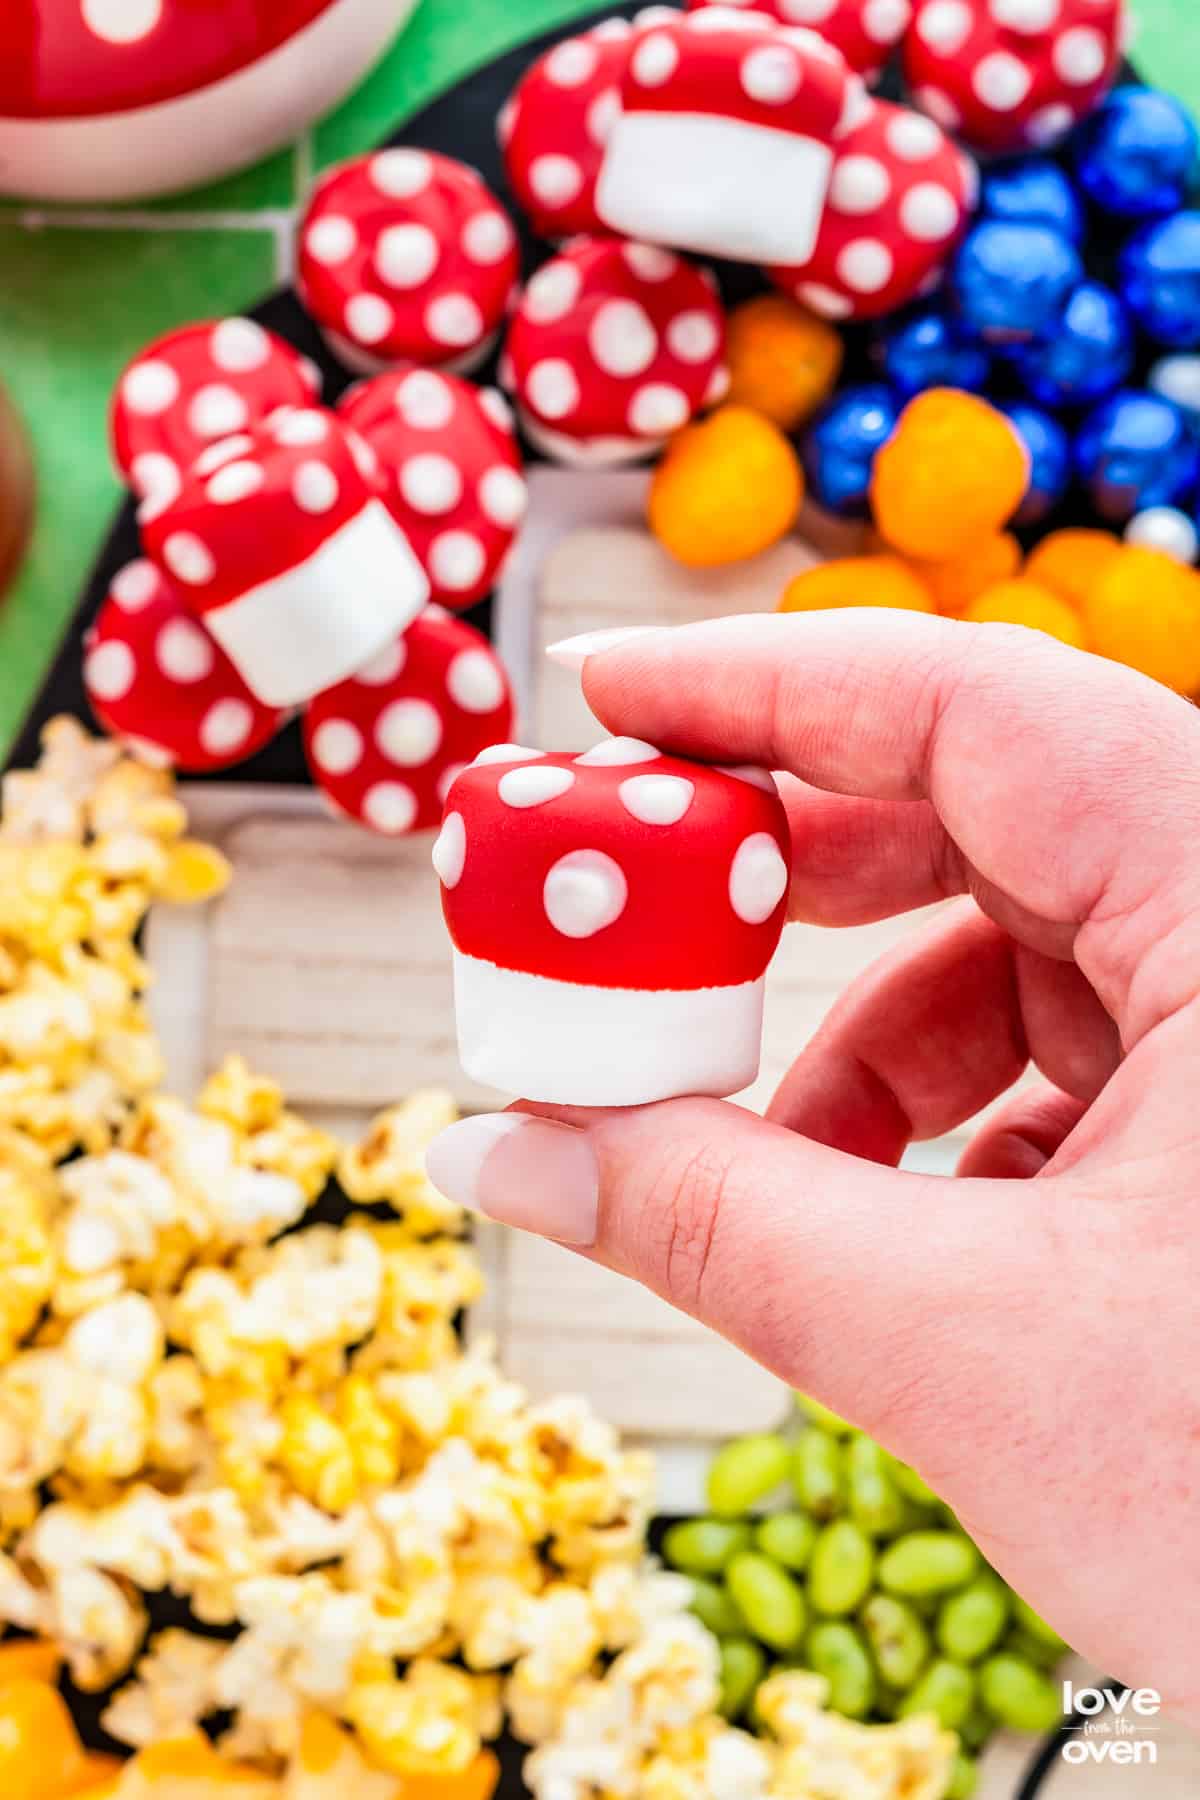
- Mushroom Marshmallows (recipe below)
To make the mushroom marshmallows and the chocolate dipped pretzels, you will also need some red, green and white chocolate candy melts. For the mushroom marshmallows, I recommend using large marshmallow, but normal sized will work too.
How To Make Mushroom Marshmallows
- In a microwave safe bowl or container, add your first color of candy melts.
- Microwave them according to the package directions, or in 20 second intervals, stirring after each interval.
- Grab a large marshmallow, and a cake pop stick. Insert the stick into the bottom of the marshmallow, then dip the top half of the marshmallow into the melted chocolate. Allow the marshmallow to harden upright in a short glass cup at room temperature. Don’t refrigerate the chocolate or else it might crack. Repeat this step with both colored chocolate, and until all the chocolate on the marshmallows have hardened.
- In a separate microwave safe bowl melt some white chocolate candy melts according to package directions, or in 20 second intervals. Grab a hardened, chocolate dipped marshmallow. Use a food dotting tool, or the bottom of a chopstick, and dip it into the white chocolate. Add dots evenly all around the hardened chocolate.
- Remove the mushroom marshmallow from the cake pop stick and let them dry on a parchment lined baking sheet.
- Once they’re dry, you’re ready to add them to the board!
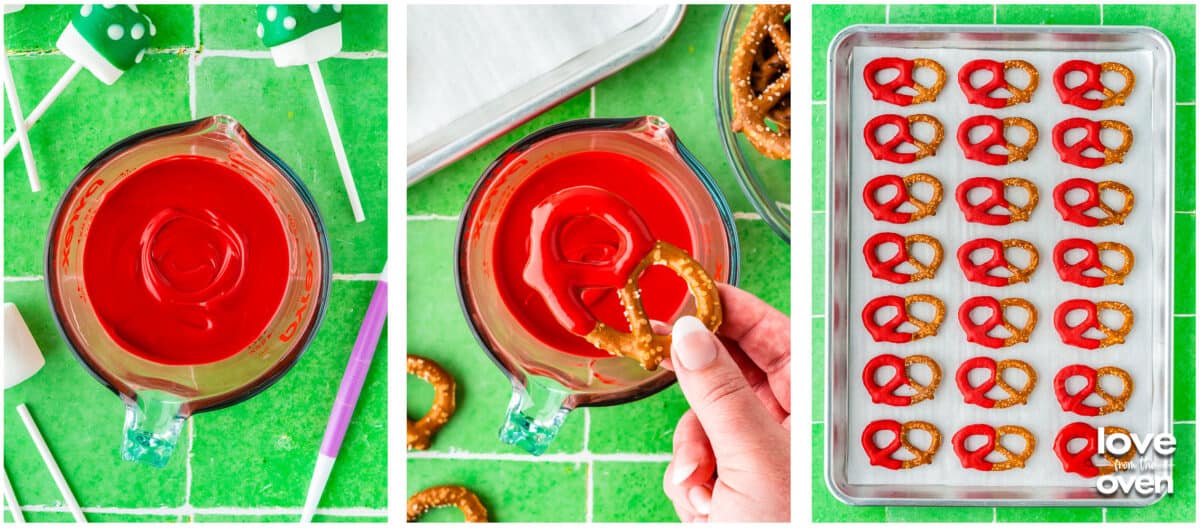
How To Make Chocolate Dipped Pretzels
- Use the same melted chocolate you used for the marshmallows. If you ran out, heat some more candy melts according to package directions, or in 20 second intervals in the microwave.
- Use your hands to grab a large hard pretzel, and dip half of it into the melted chocolate. Let the excess drip off.
- Place the chocolate dipped pretzel onto a parchment lined baking sheet and let it harden. Repeat steps 1-3 until your desired amount of chocolate pretzels have hardened. Remove from the parchment sheet and place it on your board when you’re ready to assemble.
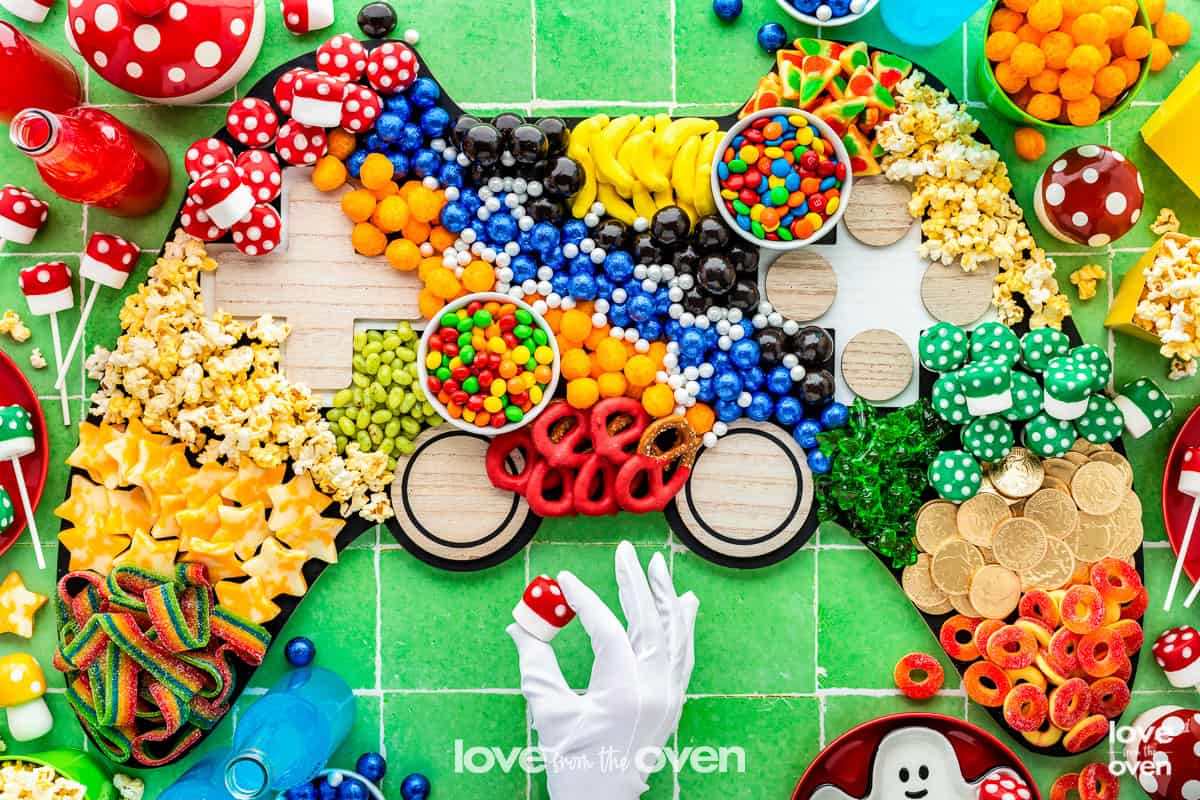
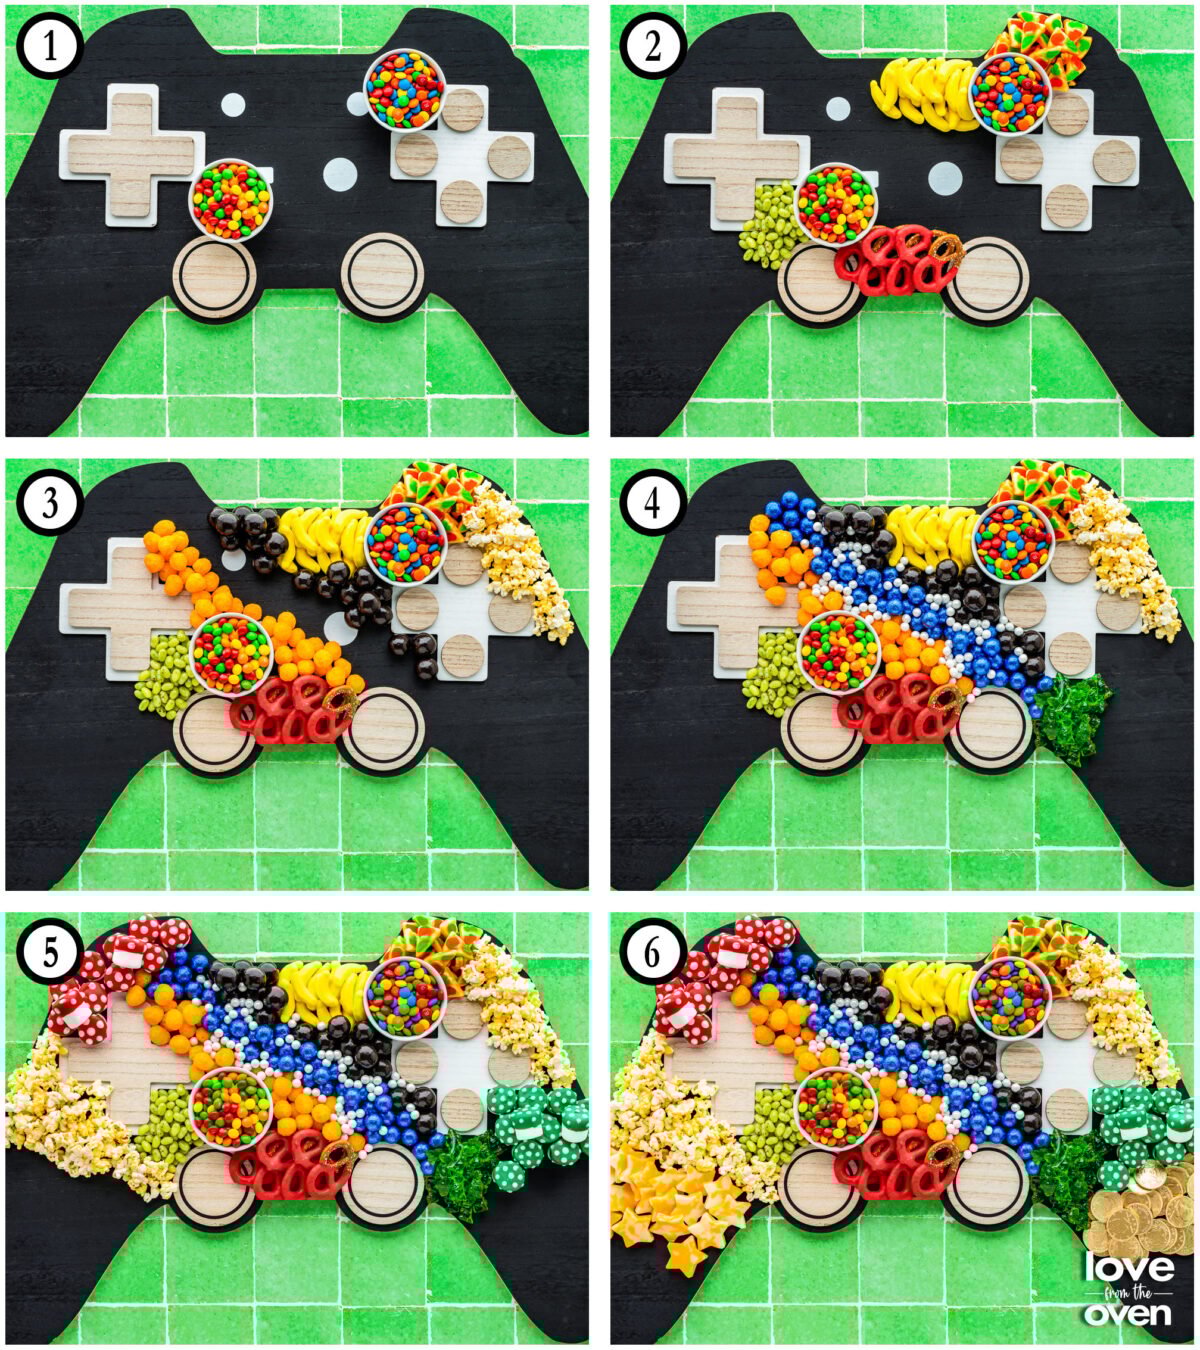
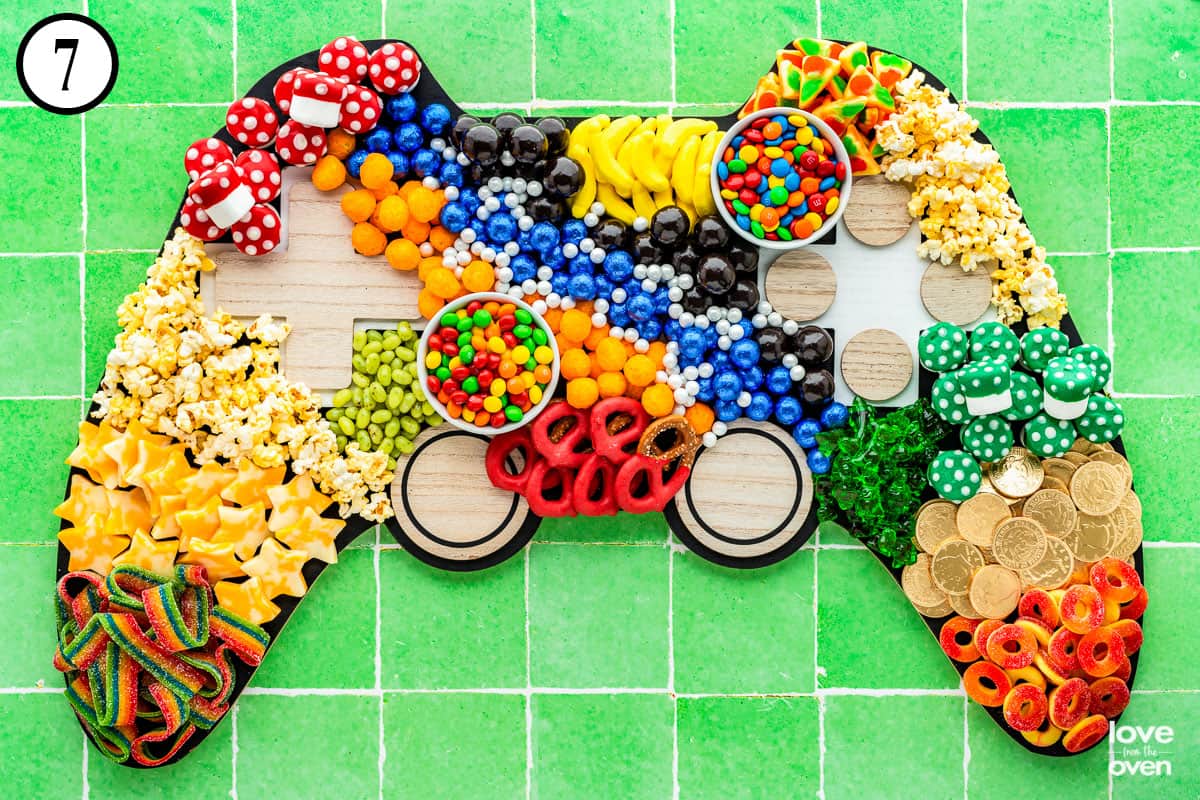
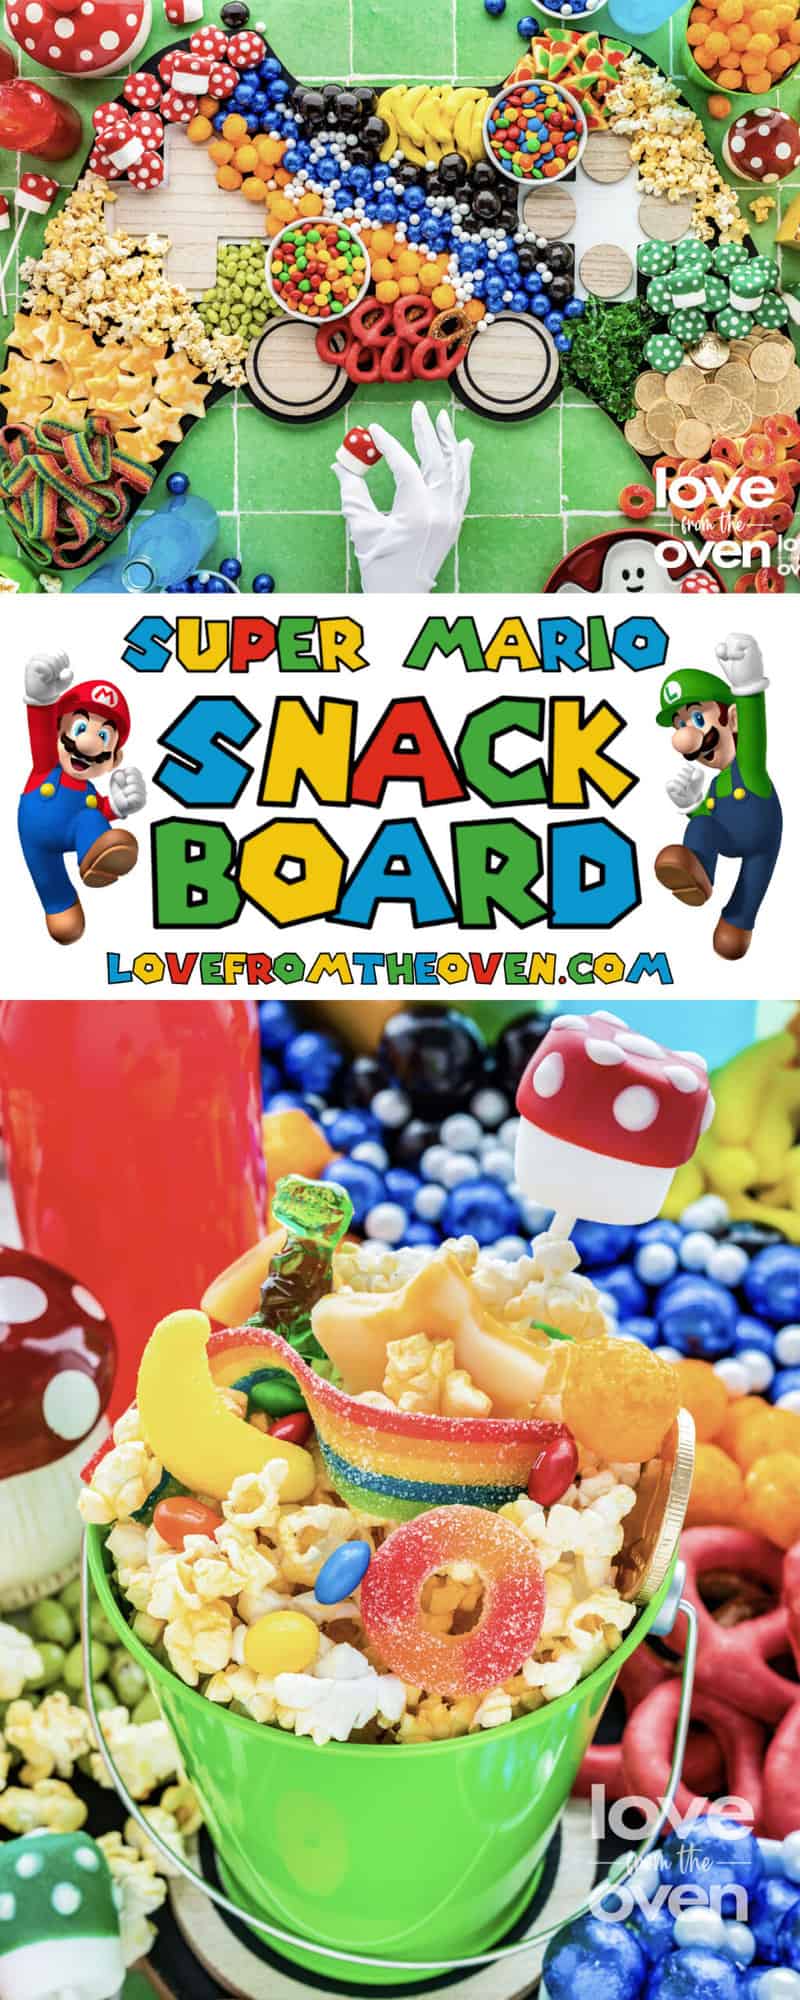
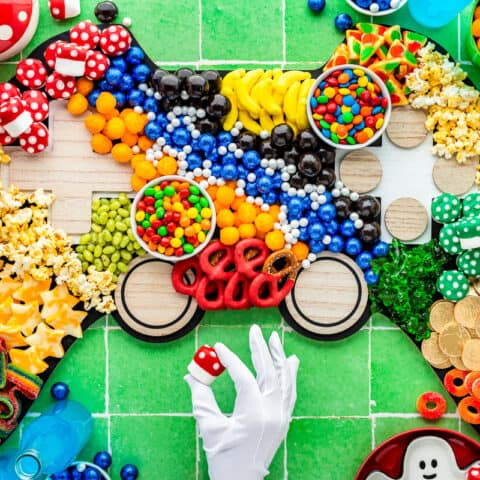
Assembling The Board
This is just a suggestion on how to assemble a Super Mario Party Snack Board. You can follow the instructions exactly, follow only some of them, or none of them at all! This is all meant for inspiration, but you’re free to do what you see fit.
- Pour the Skittles into a small bowl and M&Ms into another small bowl. Place both bowls on opposite sides of the board.
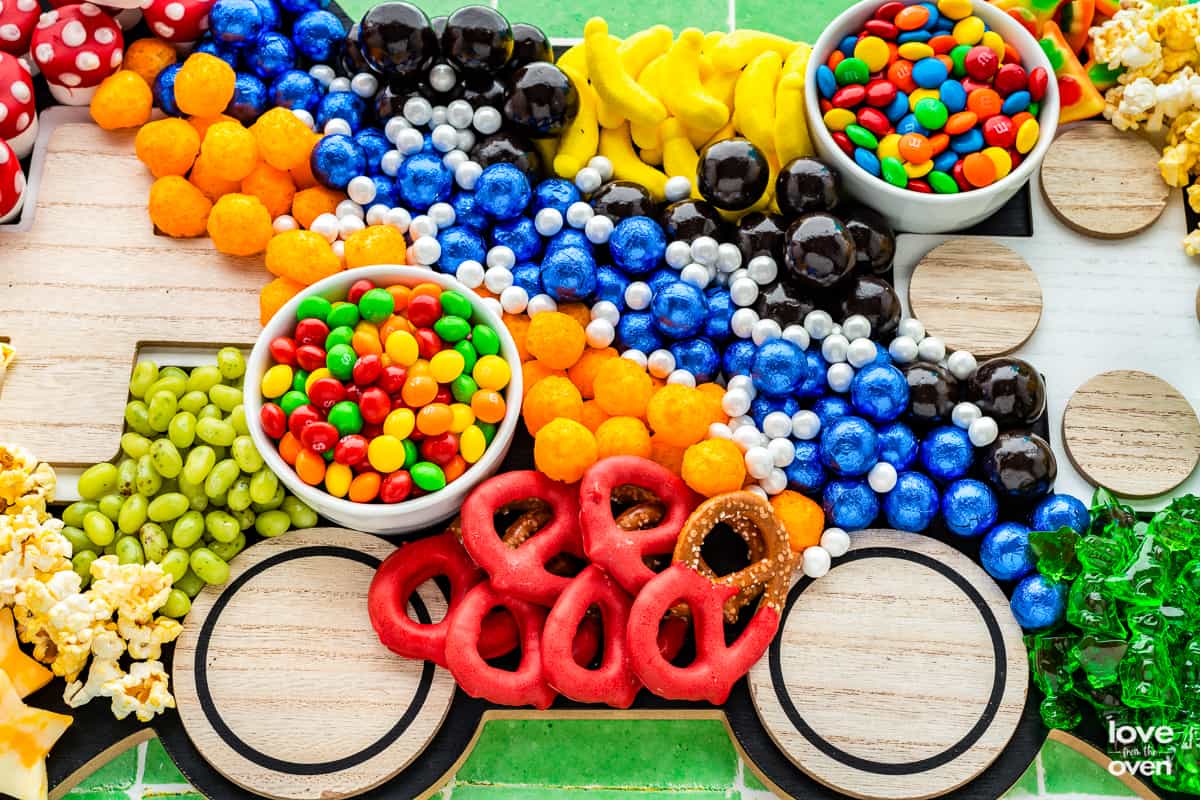
- Next, start adding some ingredients around the bowls and slowly build outwards. Add the jelly beans in a pile next to the Skittles, and a line of chocolate dipped pretzels on the other side of the Skittles. Surround the M&Ms with a pile of the gummy pizzas and gummy bananas.
- Next create a river of cheeseballs above the Skittles, and a river of the dark chocolate malt balls underneath the M&Ms.
- Fill in the gap between the two rivers of ingredients with the blue foil wrapped chocolate balls, and sprinkle the small white sixlets on top.
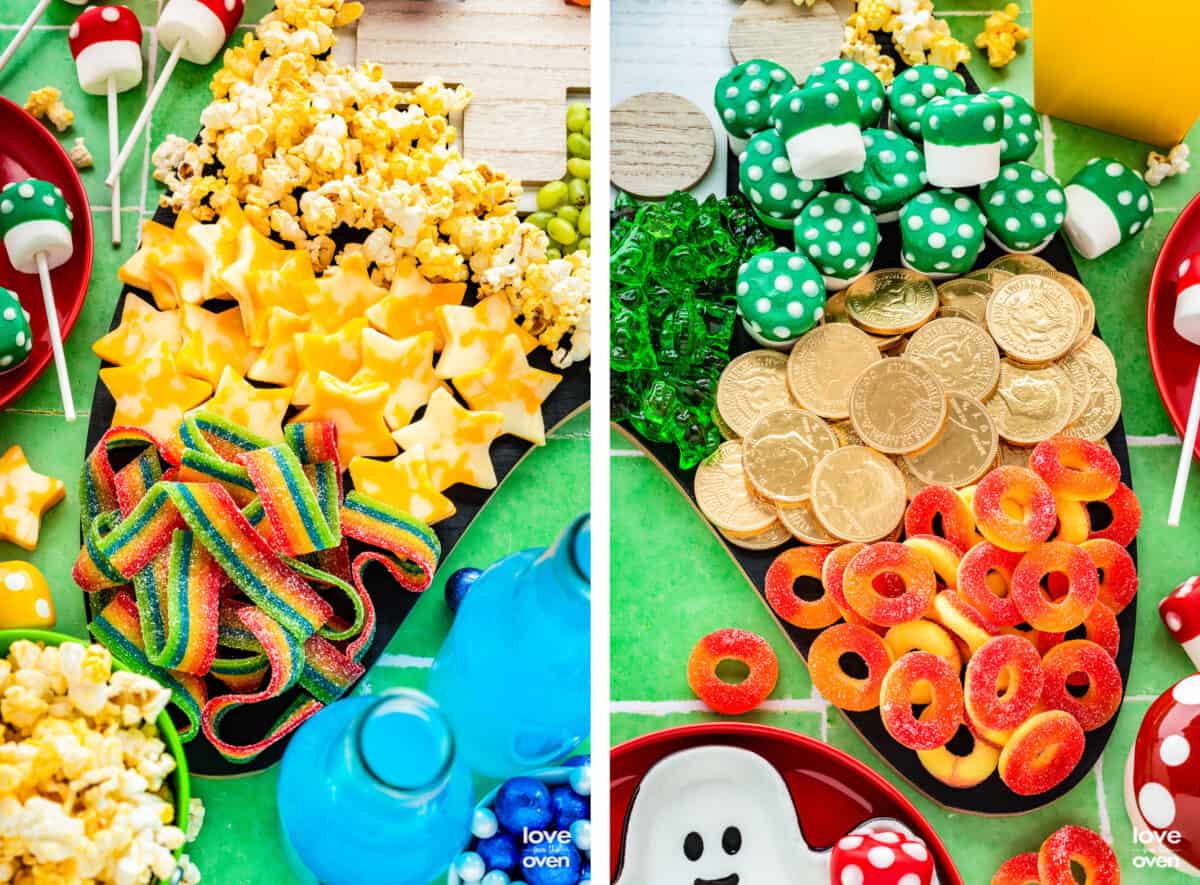
- Fill in the top edges of the board with popcorn, green gummy dinosaurs, and the mushroom marshmallows.
- Cut your Colby jack cheese into 1/4 inch slices using a small star shaped cookie cutter. Work down the remote controller and neatly place the star shaped cheese on one side, and the chocolate gold coins on the other.
- Lastly fill the bottom of the board with rainbow belts on one side and peach rings on the other. Fill in any empty gaps with more ingredients. Serve in green favor buckets with your favorite colorful sodas and enjoy!
Tips, Supplies and Advice
Video Game Controller Board – This is the video game controller board used in the photos. It’s pretty large, about 20 x 30 inches.
You don’t have to have a wooden video game controller shaped board to assemble this tray. You could cut some cardboard or a poster board in the shape of a controller using a utility or hobby knife. You can also cut the shape out on a piece of parchment paper, lay it on a flat surface and assemble on top of the parchment paper.
Here are some other options for creating a Mario Bros Charcuterie (in a wide variety of sizes):
- Plywood Game Controller Cut Out – Closest to the one shown, available in different sizes.
- Video Game Controller Tray (these come in a variety of fun colors)
- Wood Video Game Controller Cut Out
- Controller Shaped Paper Plates
- Video Game Controller Bento Box
- Mario Bros Cupcake Stand
- Paper Mario Bros Food Trays
- Mario Bros Party Treat Boxes
- Mario Bros Treat Stand
- Mario Candy Boxes – Perfect for guests to fill with treats
- Video Game Controller Wood Cut Out
Equipment
Here’s some of the materials you’ll need for this recipe:
- Microwave Safe Bowls – I like to use Pyrex measuring cups.
- Food Dotting Tool or Chopsticks
- Cake Pop Sticks
- Parchment Paper – Used with melted chocolate, but can also be used directly on the board to prevent the food from touching the board itself.
- Baking Sheets
- Star Cookie Cutter
Cookie Cutter Tips – If cheese residue gets stuck in the cookie cutter, or it keeps sticking to the sides, run the cutter under hot water for 15 seconds. This will allow the metal to heat up making it easier to cut the cheese!
Cooling Rack Hack – When letting the mushroom marshmallows dry, you may find it hard to keep them upright. Try placing a cooling rack over 2 large bowls to elevate it, then slide stick of the marshmallow pops through the wire rack so they stay upright.
Bright and colorful
When assembling the Super Mario Party Board, keep in mind a few tips to make your snack board look as striking as possible! Let each food have its own space on the board. You don’t want to scatter the food, otherwise it won’t look put together. While some ingredients look okay when placed in a large pile on the board, there are some others that you may want to line up neatly.
Use the “River” method with some of the candy to make it look like the snacks are traveling across the board. Line the ingredients up on a diagonal going across the board to create movement and break up some of the other ingredients.
FAQs
You can put anything your Super Mario heart desires on this snack board! You can add some fruit, and cut them into fun shapes. You can also add anything gold, rainbow colored, or colors of the rainbow to this board. Really get as creative or as simple as you want!
Recipes You’ll Love
In need of some more snack board ideas? You’re going to love some more of these clever, colorful, recipes that are sure to be a showstopper at your next gathering.
More Party Recipes to Try!!
Super Mario Snack Board
Ingredients
Super Mario Snack Board – Ingredient Suggestions and Ideas
- Popcorn
- Cheese Balls
- Skittles
- M&Ms
- Green Juicy Pear Jelly Beans
- Peach Rings
- Blue Foil Wrapped Chocolate Balls
- Dark Chocolate Malt Balls
- White Sixlet Pearls
- Gummy Dinosaurs
- Gummy Pizza Slices
- Sour Rainbow Belts
- Chocolate Gold Coins
- Candy Bananas
- Large Hard Pretzels
- Colby Jack Cheese (cut into star shapes)
- Mushbroom Marshmallows (Recipe in post above)
- Red, White and Green Candy Melts
Instructions
- This is just a suggestion on how to assemble a Super Mario Party Snack Board. You can follow the instructions exactly, follow only some of them, or none of them at all! This is all meant for inspiration, but you’re free to do what you see fit.
- Pour the Skittles into a small bowl and M&Ms into another small bowl. Place both bowls on opposite sides of the board.
- Next, start adding some ingredients around the bowls and slowly build outwards. Add the jelly beans in a pile next to the Skittles, and a line of chocolate dipped pretzels on the other side of the Skittles. Surround the M&Ms with a pile of the gummy pizzas and candy bananas.
- Next create a river of cheeseballs above the Skittles, and a river of the large dark chocolate malt balls underneath the M&Ms.
- Fill in the gap between the two rivers of ingredients with the blue foil wrapped chocolate balls, and sprinkle the small white sixlets on top.
- Fill in the top edges of the board with popcorn, gummy dinosaurs, and the mushroom marshmallows.
- Work down the remote controller and neatly place the star shaped cheese on one side, and the chocolate gold coins on the other.
- Lastly fill the bottom of the board with rainbow belts on one side and peach rings on the other. Fill in any empty gaps with more ingredients, serve and enjoy!
Notes
The nutrition facts provided are calculated using a third-party tool and are estimates only. Actual nutritional content may vary based on the ingredients and brands you use, as well as portion sizes. For accurate results, please consult a registered dietitian or nutritionist.
Enchanting Culinary Content Produced by Lady LaDuke Co.

Meet Christi, Love From The Oven
I’m Christi I love sharing easy & delicious recipes that your family & friends will love. I’m a mom, baker, cookbook author and lover of sprinkles.


Nicely written piece!… Could use a bit more detail, but overall solid.!
The tips here are easy to apply. You broke it down in a simple way. Great job explaining a complex topic.
This was a blast to both eat AND make!! My party-goers loved it.