Do you have a Babycakes Cakepop Maker and are looking for info on how to make cake pops with it? If so you’ve come to the right place. Pull up a chair, grab a cake pop and let me show you how to use your cake pop maker!

Using A Machine To Make Cake Pops
One of my Mother’s Day gifts this year was the Babycakes Cake Pop Maker.
I will admit, my first thought was “I bet this won’t work”. Cake pops require baking and destroying a cake, mushing it with frosting, and forming all of the pops by hand.
It just won’t work if you don’t do it the way Bakeralla does it. I thought the cake pops would be dry, they will fall off the stick and probably won’t even taste good. It will be yet another kitchen gadget that will collect dust.
While I had my doubts, I also have to admit that I don’t LOVE the traditional cake pops (please don’t judge me!). I don’t know why – it’s frosting and cake – what’s not to love – but the flavor has just never been that great to me. I do love making Oreo truffle pops, but the true cake pop I’m only luke warm on at best. So part of me wondered if this little machine could create cake pops I’d like more. Maybe???
Babycakes Cake Pop Maker
I am very happy to report that I was extremely impressed with the Babycakes Cake Pop Maker. This sweet little machine won me over in less time than it would have taken me to bake a cake (much less the time spent letting it cool, mixing it with frosting and forming into pops).
Let me share my batch of cake pops using the Babycakes Cake Pop Maker.

My cake pop maker came with the machine, sticks, a fork, a syringe for fillings and a cake pop stand. I decided to use their vanilla cake pop recipe. It was a bit thicker than cake batter from a mix, it was incredibly tasty straight from the bowl and it was delicious when baked. It had a texture that reminded me of pound cake.
Between my husband, daughter and myself, quite a few pops never saw a coating of chocolate. Those little cake balls are great on their on.

How To Use Your Cake Pop Maker
After mixing up my batter, I decided to follow their tip of putting the batter into a bag, and piping it into the machine I’m sure you can use a pastry bag, but a large Ziploc did the job nicely.

Whenever I need to fill a bag like this, I use a heavy mug to hold the bag for me while I scoop in the frosting or batter. After filling the bag, I snipped the end off and was ready to start cooking.

Piping the batter in was easy, I think spooning it in would be harder and probably a bit messier. My first batch I didn’t use quite enough batter, so they were not perfectly shaped, but they were certainly close enough.
The other thing I learned with my first batch was that I jumped the gun on thinking they were done, and cutting one open revealed that they were not. The 4-5 minutes recommended baking time was pretty accurate.

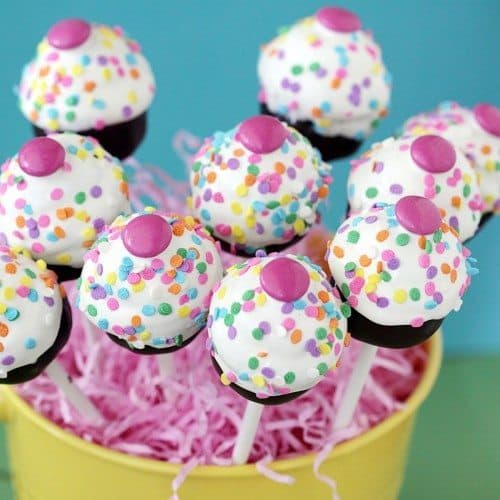
Look how cute they are! The machine does get very hot, and they include a special fork for you to use to get the cake pops out. I ended up just popping them out with my hands, but the fork works well (and is no doubt safer!). The included cake pop stand is perfect for cooling your cake pops.

They cooled quite quickly. I am going to order some additional cake pop stands, but for the time being I used an empty egg carton to hold my cake pops after they cooled off.

My daughter suggested we fill them with buttercream frosting. I figured it was worth trying. I whipped up a small amount of buttercream, filled the syringe, and we injected buttercream into about half of our cake pops.

Dipping Cake Pops In Chocolate
After making all of my cake pops, I stuck them in the freezer for a few minutes while I melted my chocolate to dip them in.
For my chocolate, I used Wiltons Melts, which will set up better than using chocolate chips. I dipped each stick into the chocolate and then into a cake pop. To be honest, I was worried how the cake pops would do on the sticks, since they aren’t as moist as the frosting style cake pops.
I am happy to report I actually found them easier to handle on the sticks. Not a single one fell off a stick, while I usually have a few of when I make cake pops.

After putting them on the sticks, I stuck them back in the freezer. Freezing them, and dipping them while cold, helps the chocolate set up quickly.
Someone asked what the trick was to prevent the chocolate from dripping down the stick was. For me what works best is a combo of making sure the cake pops are cold and keeping the chocolate from getting too thick. To do this I pop it back into the microwave for a few seconds as needed.
Then after I dip the pop in chocolate, I tap, tap, tap to get off as much excess chocolate as possible. After that I sort of twirl the the cake pop until the chocolate has started to set, then put it into the cake pop stand, or block of Styrofoam. That said, I always have a few that drip. Really I don’t worry that much about it.

The Verdict
For me, I found these far easier to dip than traditional cake pops. They never felt wobbly on the stick, not one came loose from the stick, and they are so perfectly round – something I never achieved with other cake pops.
How do they taste?
Personally, I LOVE them. No, they are not dry – they were moist and delicious. They do not have the same consistency of the cake and frosting cake pops, but these suit my taste a bit better. It tastes like cake – and to me that’s a very good thing.

CAKE POPS WITH THE
BABYCAKES CAKE POP MAKER

Vanilla Cake Pop Recipe For Babycakes Cake Pop Maker
Equipment
- Cake Pop Maker
Ingredients
- 1 1/2 cups all-purpose flour
- 1 tsp baking powder
- 1/4 tsp salt
- 1/2 cup butter (softened)
- 1 cup sugar
- 2 eggs
- 2 teaspoons vanilla
- 1/2 cup milk
- Glaze, chocolate or coating of choice
Instructions
- Combine flour, baking powder and salt. Set aside.
- In a separate bowl, beat together butter and sugar until light and creamy. Beat in eggs and vanilla.
- Alternately blend in flour mixture and milk into butter mixture, beginning and ending with the flour mixture.
- Fill each cooking reservoir with about 1 tablespoon of batter.
- Bake 4 to 5 minutes or until a toothpick inserted into a cake pop comes out clean. Allow to cool completely prior to glazing or coating.
Nutrition
The nutrition facts provided are calculated using a third-party tool and are estimates only. Actual nutritional content may vary based on the ingredients and brands you use, as well as portion sizes. For accurate results, please consult a registered dietitian or nutritionist.
I also have a chocolate cake pop
recipe for the Babycakes Cake Pop Maker!
I think there is plenty of room for all of the different kinds of cake pops, but I think these will be the ones I make most often. They were so much quicker and easier, and I enjoyed the process more because of it.

I am also excited to see what else I can make with this little machine – and will be sharing one of my favorite desserts with you later this week – it involves donut holes, and this will be perfect for creating them.
Cake pop anyone?

Check out my other cake pop posts by clicking here!

Meet Christi, Love From The Oven
I’m Christi I love sharing easy & delicious recipes that your family & friends will love. I’m a mom, baker, cookbook author and lover of sprinkles.


Very nice recipe. Thanks
I want to try them with condensed milk instead of regular milk, is there a version for that
First time on your site, love how detailed you were! Im not a huge fan of cake pops, but love baking cakes. Makes sense though. Right.
Could one use box cake mix instead of the recipe?
Thanks in advance!
This is a pretty old recipe so my memory is a bit hazy, but if I recall the best idea would be to use a box of something like a pound cake mix. Regular cake mix creates a cake that’s a bit too light and fluffy for this, so you need something more dense.
Can the flour be switched for gluten free?
I’m not familiar with how gluten free flours perform in any recipe as I don’t use them. Sorry I can’t help.
Easy and delicious! Thanks for sharing
I used my machine to make hush puppys!
Needed a recipe and this was great
Sup. This good. Do again