Red Velvet Whoopie Pies are heart shaped for an adorable Valentine’s Day dessert! A rich cream cheese filling gets sandwiched between cakey red velvet cookies for an impressive cookie that’s made with love.

Just when you think you’ve finally recovered from all the Christmas Cookies, it’s time to get ready for all things pink, red, sweet and heart-shaped. These Valentine’s Day treats combine the swoon-worthy flavor of red velvet cake with the nostalgic joy of a classic whoopie pie.
Reasons You’ll Love This Recipe:
Made from scratch – No cake mix needed for this recipe.
Cream cheese frosting – This filing is the perfect match for red velvet!
Beautiful red color – We use food gel coloring for a more intense red hue.
Shaped like hearts – Nothing says “I love you” like a picture-perfect heart shaped whoopie pie!
Made with love – Your friends and family will feel loved when you make them a batch of these sweetheart treats.
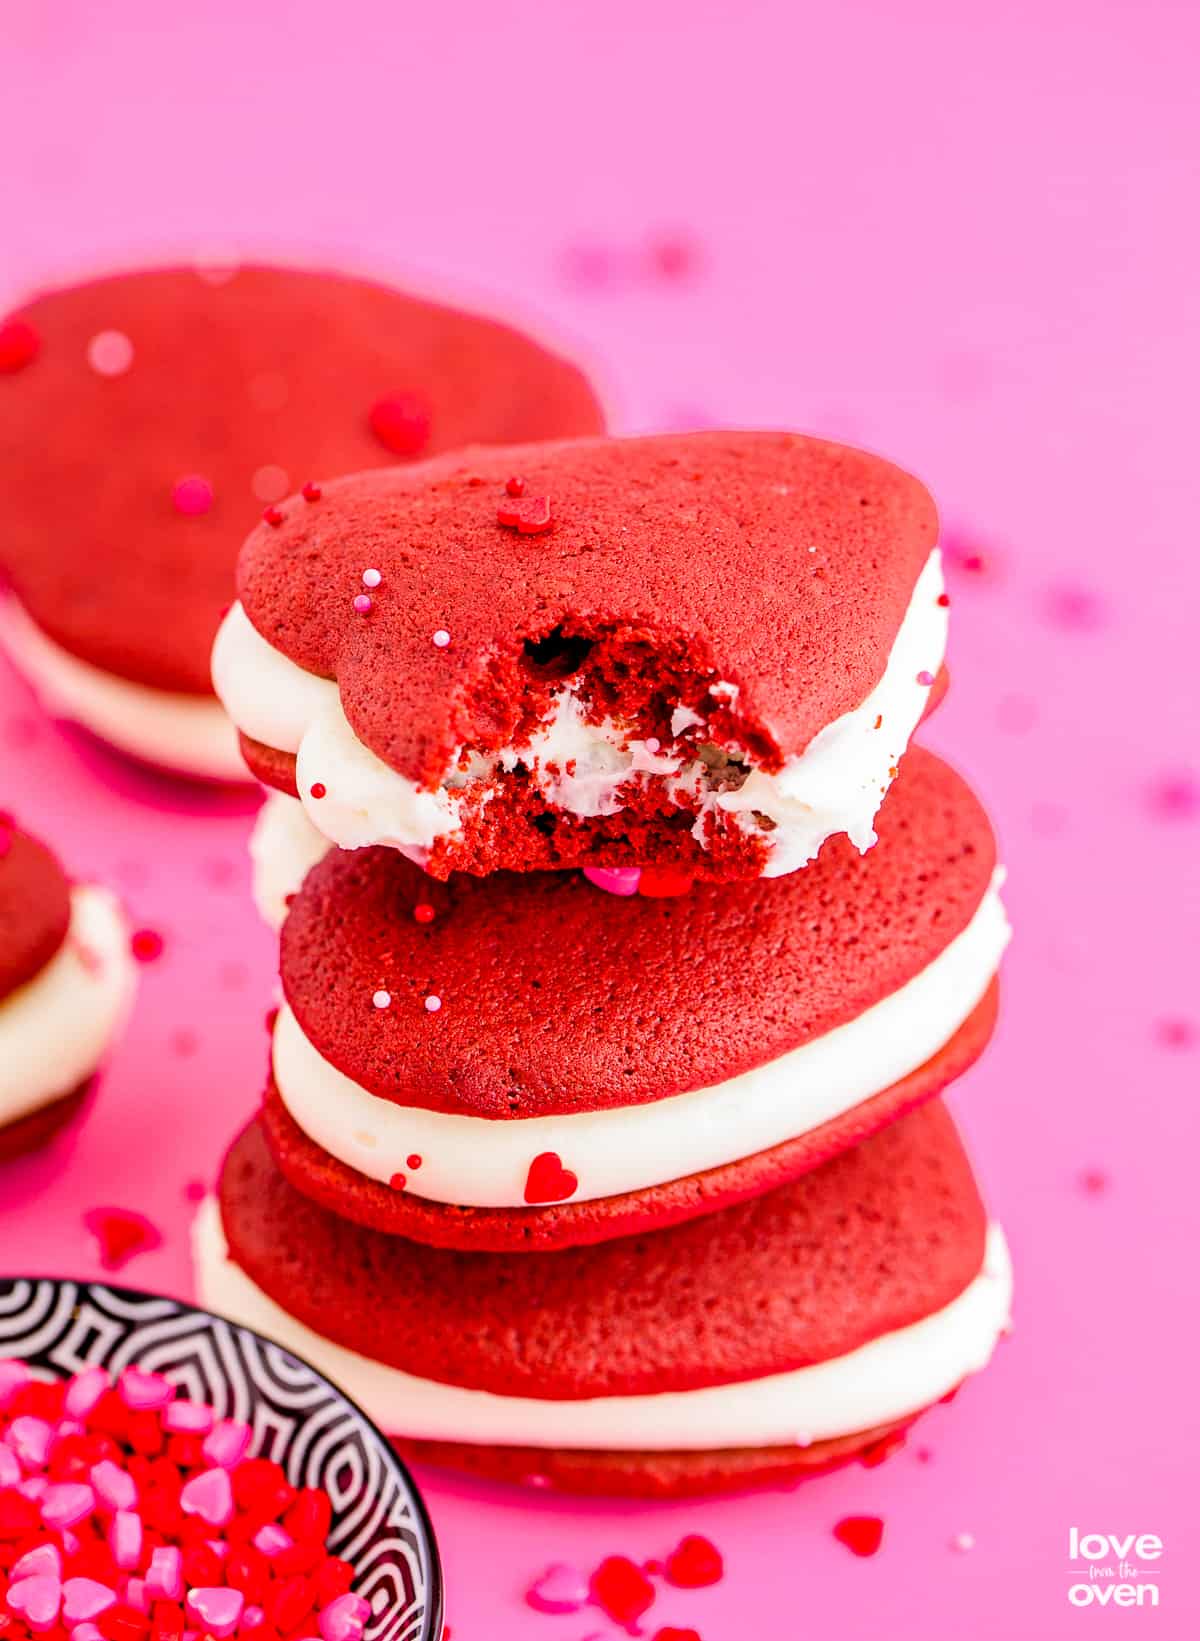
We love Red Velvet recipes, especially around Valentine’s Day. From Red Velvet Cake Mix Cookies to Red Velvet Brownies and Red Velvet Cupcakes, the unique sweet flavor with just a touch of tartness, is hard to resist. These Heart Shaped Whoopie Pies are an adorable addition to the Valentine Recipes lineup.
Recipe Ingredients
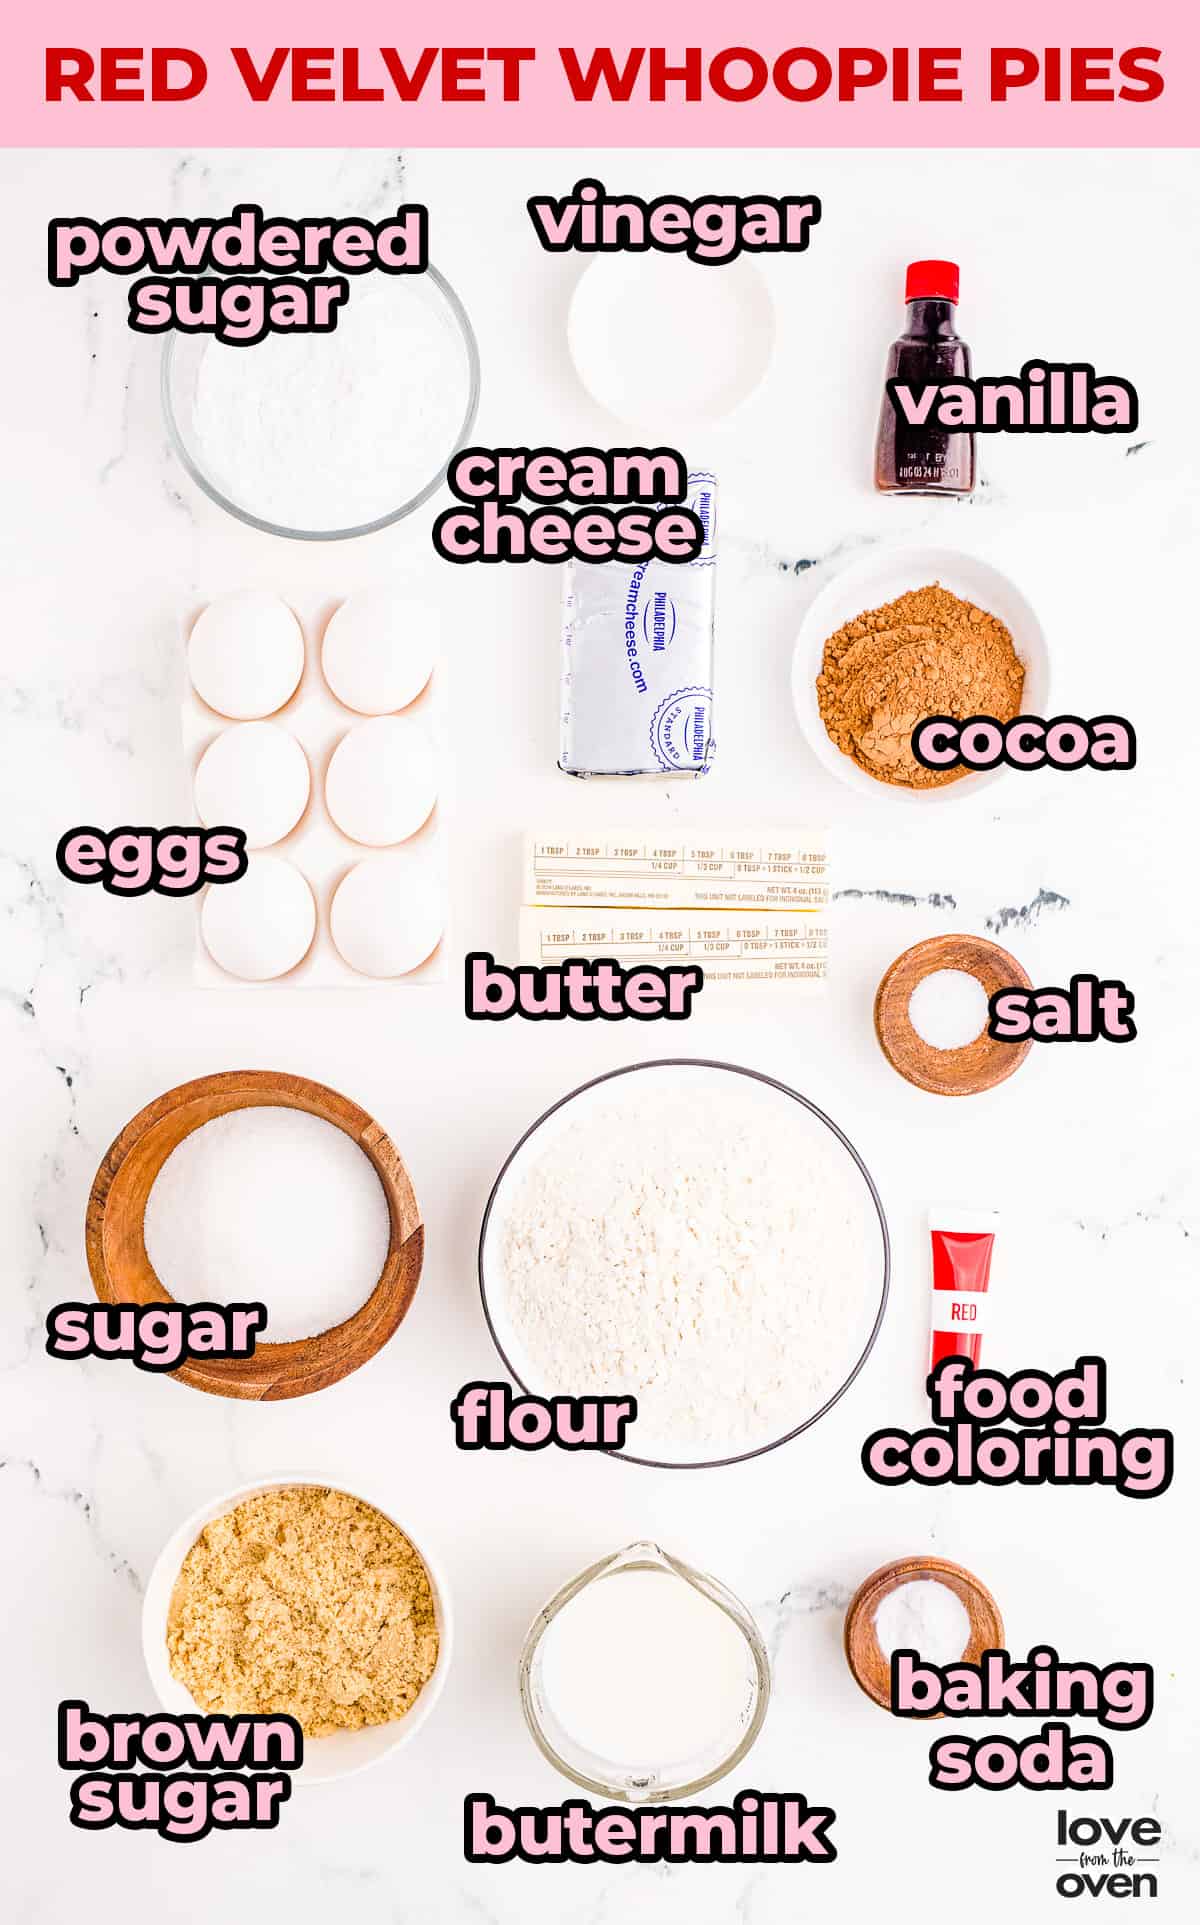
This is an overview of the ingredients you will need to make Red Velvet Whoopie Pies. Important notes and substitutions for certain ingredients are discussed. The full printable recipe, with amounts and specific details, can be found at the bottom of the page.
Ingredient Notes & Substitutions
The ingredients used in this recipe are quite common and ones you likely have in your pantry. Here are a few notes and substitution suggestions.
- Buttermilk – While you can use a homemade buttermilk recipe, I really urge you to get actual buttermilk for this recipe. It lends a creamy texture, contributes to the tangy flavor and helps with the rise. When you only use a small amount of buttermilk, the DIY version is fine, but you use two cups in this recipe, so the real deal really is the best choice.
- Food Coloring – I highly recommend the gel food coloring, because you’ll get a better color with less food coloring. And yes, you can leave it out, but the whoopie pies won’t be red. You can use a different color, but red tends to show up the best. Other colors tend to get a bit muddy due to the cocoa powder.
- Butter – You can use salted or unsalted butter. If you use unsalted, you can add 1/4 teaspoon of salt to the recipe.
- Cream Cheese – Make sure you use the cream cheese that comes in brick style, not the type that comes in a tub. It’s also essential that it is softened, otherwise it will be lumpy when you go to mix it.
- Cocoa Powder – This is an unsweetened cocoa powder, not hot cocoa.

How To Make Red Velvet Whoopie Pies
Let’s discuss the ingredients you’ll need, and the steps you’ll take, to whip up a batch of homemade Red Velvet Whoopie Pies. If you want to skip my discussion, tips, information and answers to frequently asked questions, just scroll to the bottom of this post for the printable recipe.
1. In a large mixing bowl, use an electric mixer to cream the butter.
2. Add sugars to the butter and beat together for at least 3 minutes on medium high speed until it is light and fluffy.
3. Beat in the eggs until batter is smooth.
4. Add buttermilk to mixture.
5. Add red food coloring to mixture.
6. Mix ingredients until combined.
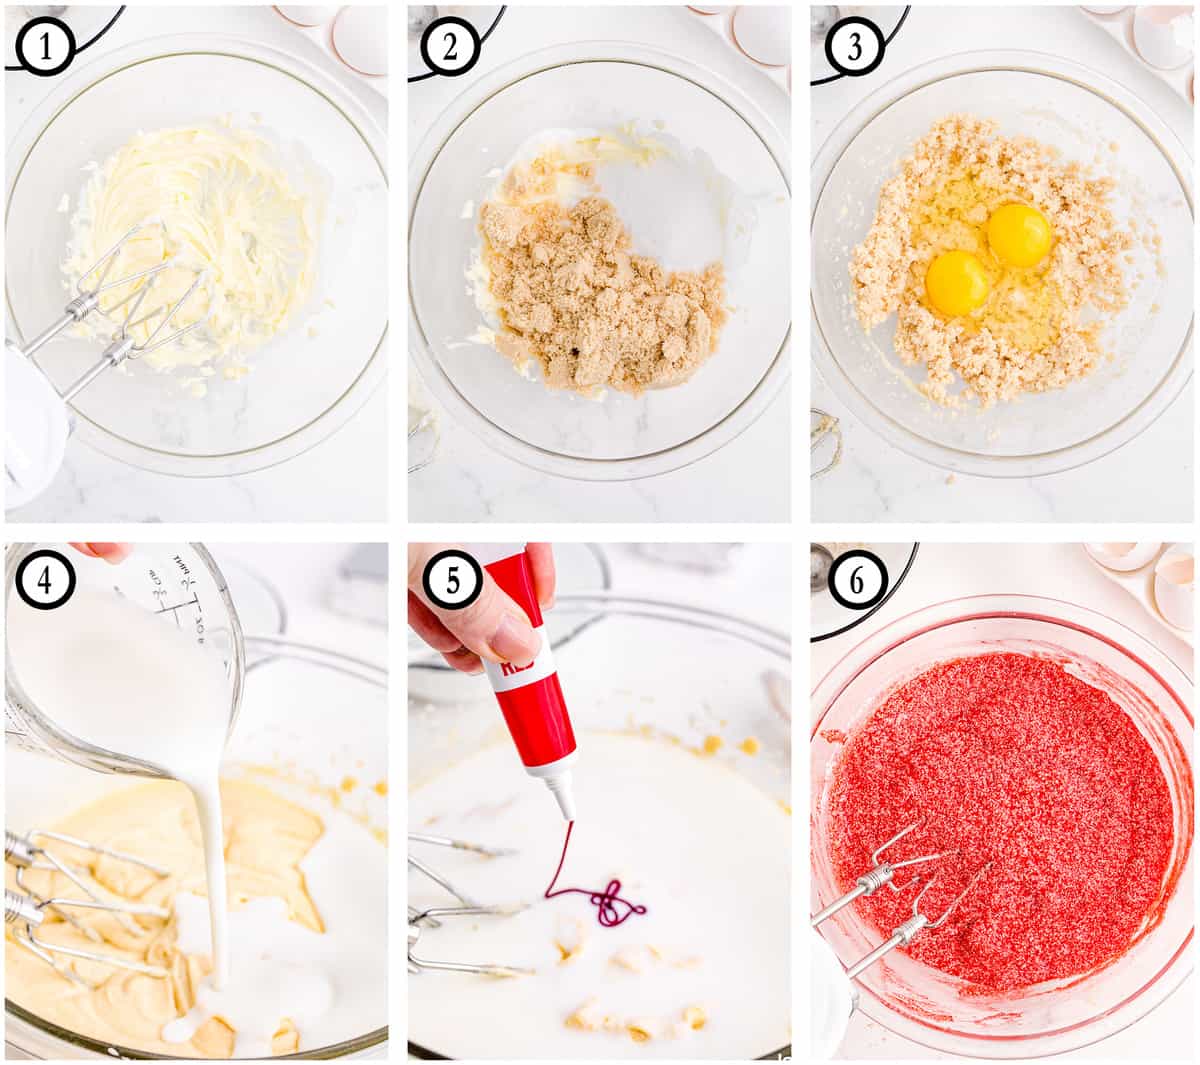
7. In a separate bowl, add flour, cocoa, baking soda, and salt.
8. Whisk until combined.
9. Add flour mixture to the wet ingredients and mix to combine. Add in vanilla and vinegar and mix until just combined.
10. The batter will look more like cake batter than cookie batter.
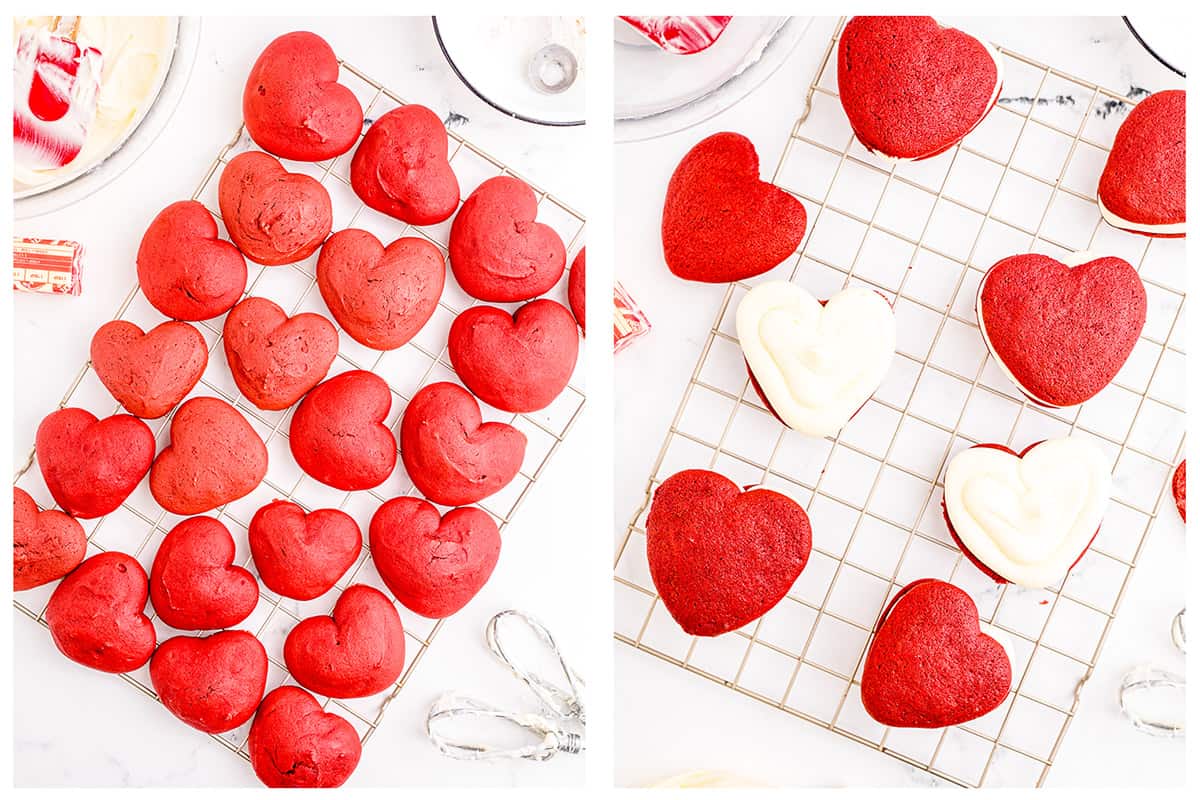
11. Stencil heart shapes all over the parchment paper, leaving about an inch of space between each. Flip parchment paper over so that the side with pencil marks will not be the side that the food touches. ). I find it easiest to trace a small heart-shaped cookie cutter, but you may make a template for yourself. The goal is for all of the hearts to be the same size.
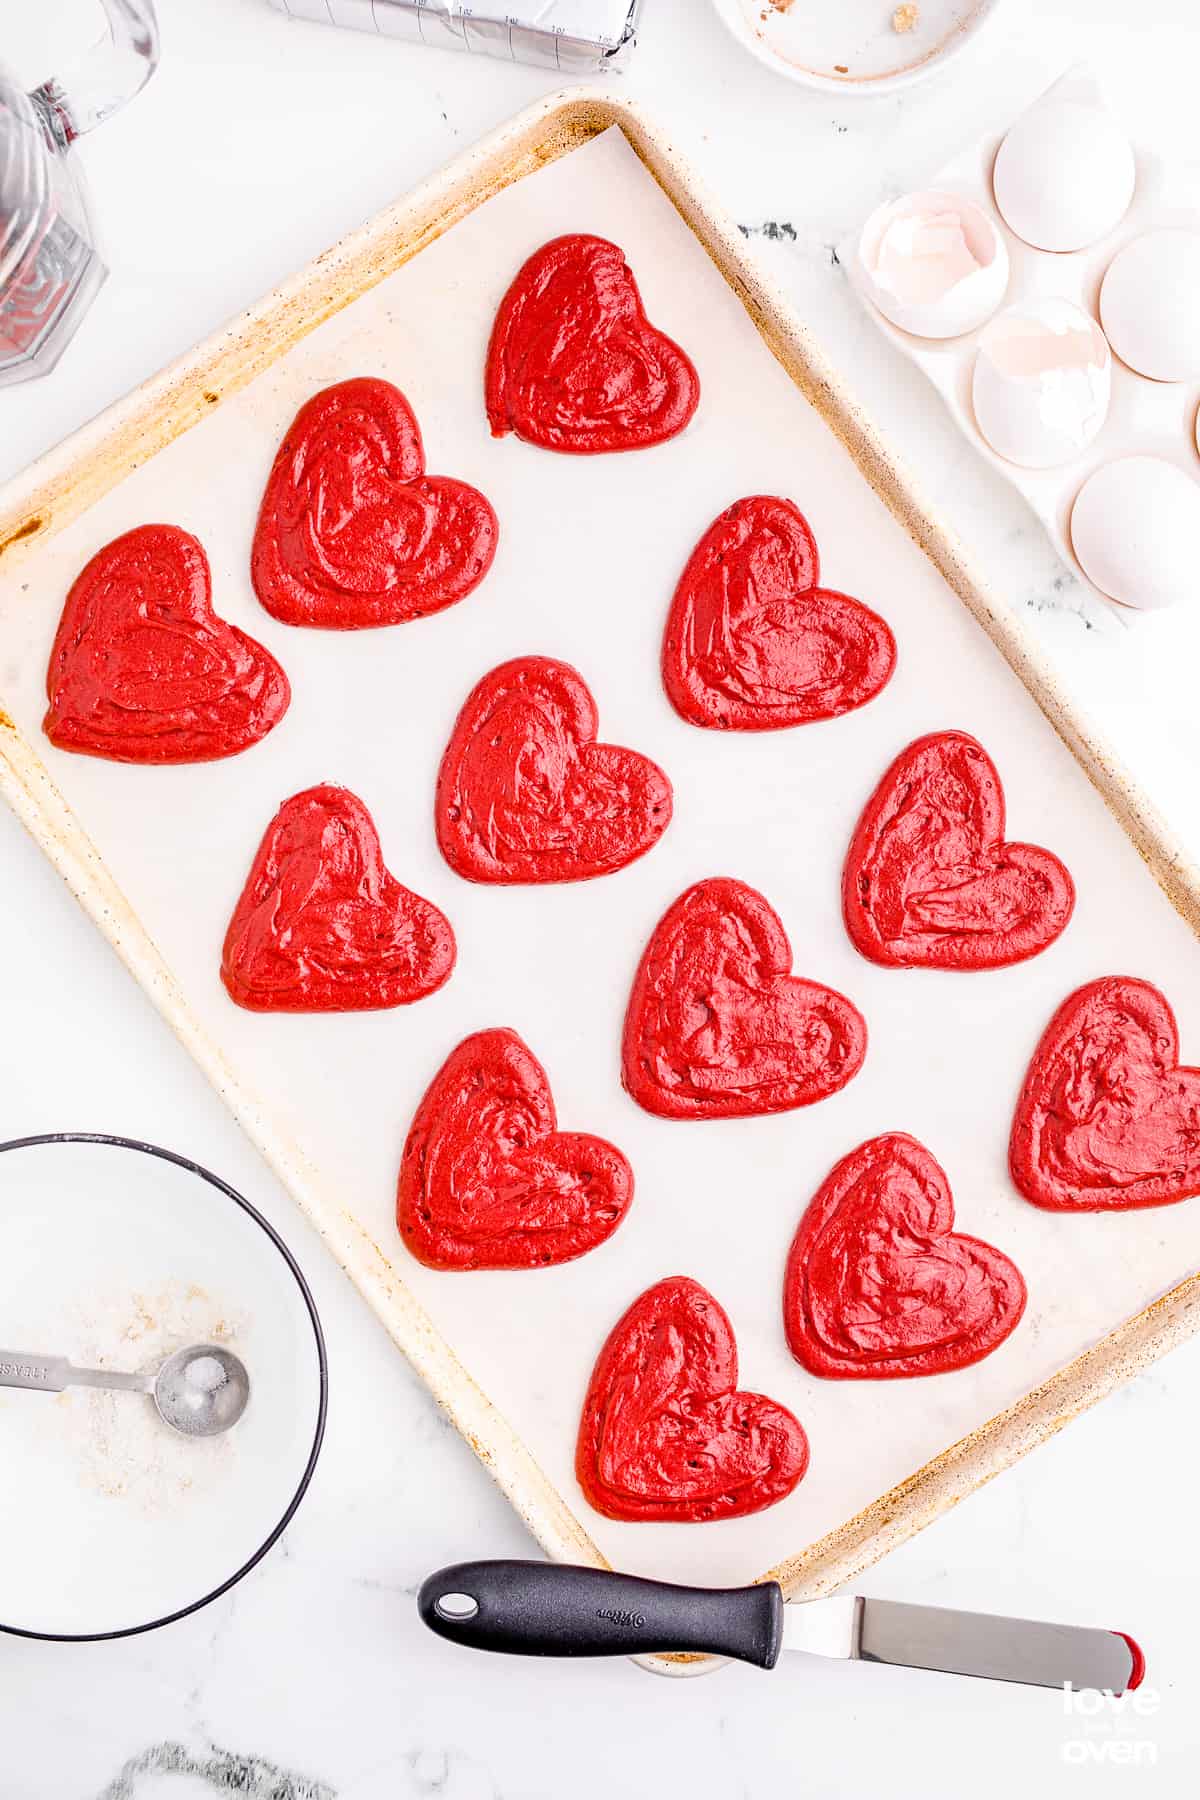
12. Place the batter into a piping bag with a Wilton 1A round tip. If you don’t have one, you could cut the corner out of a large zip-lock bag and this will work as well. Pipe the batter into heart shapes leaving about two inches of space between them. The cookies will spread while baking.
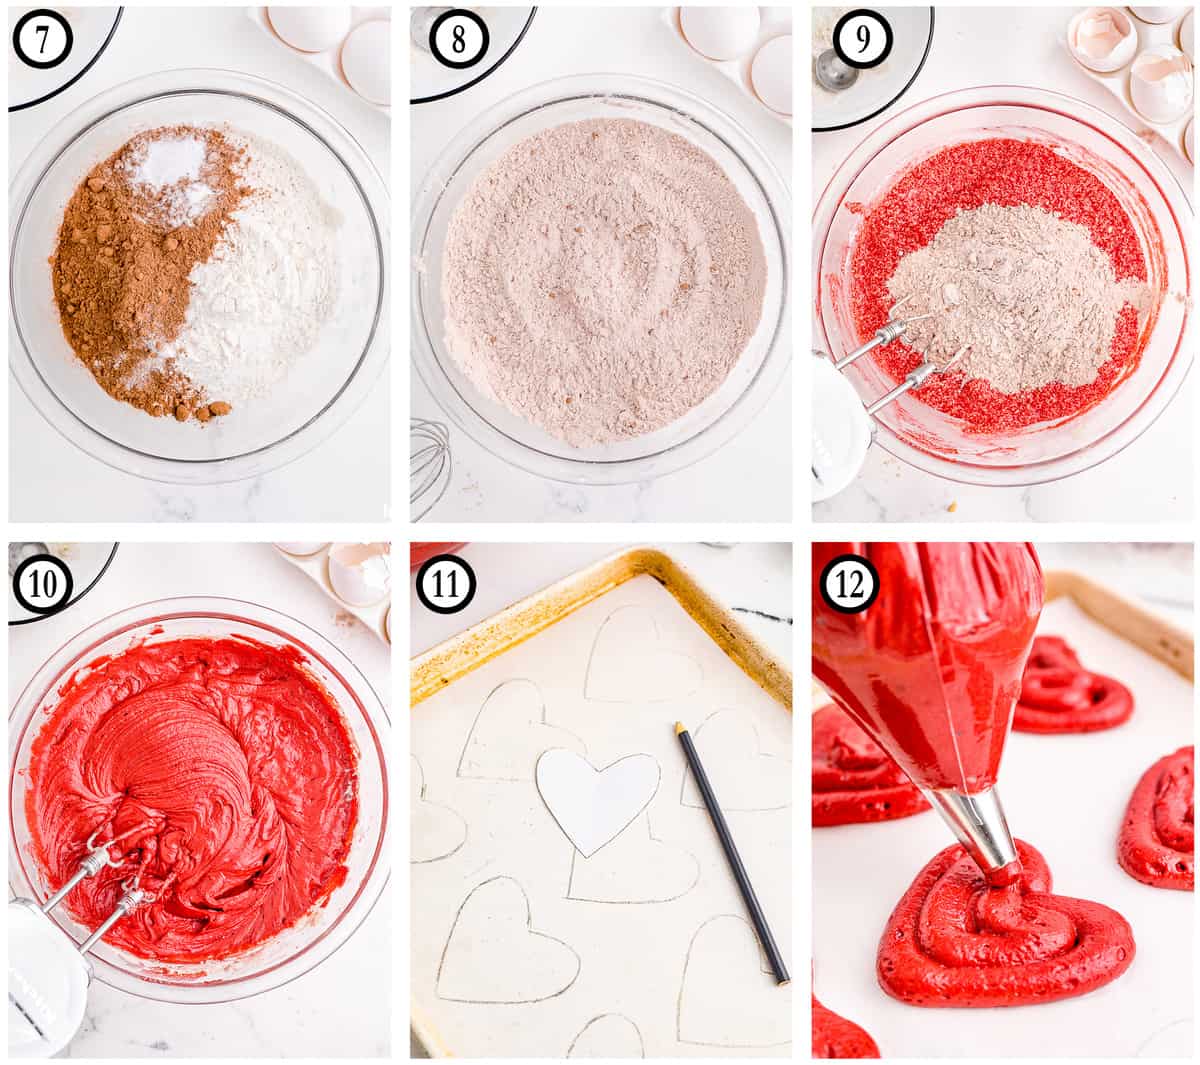
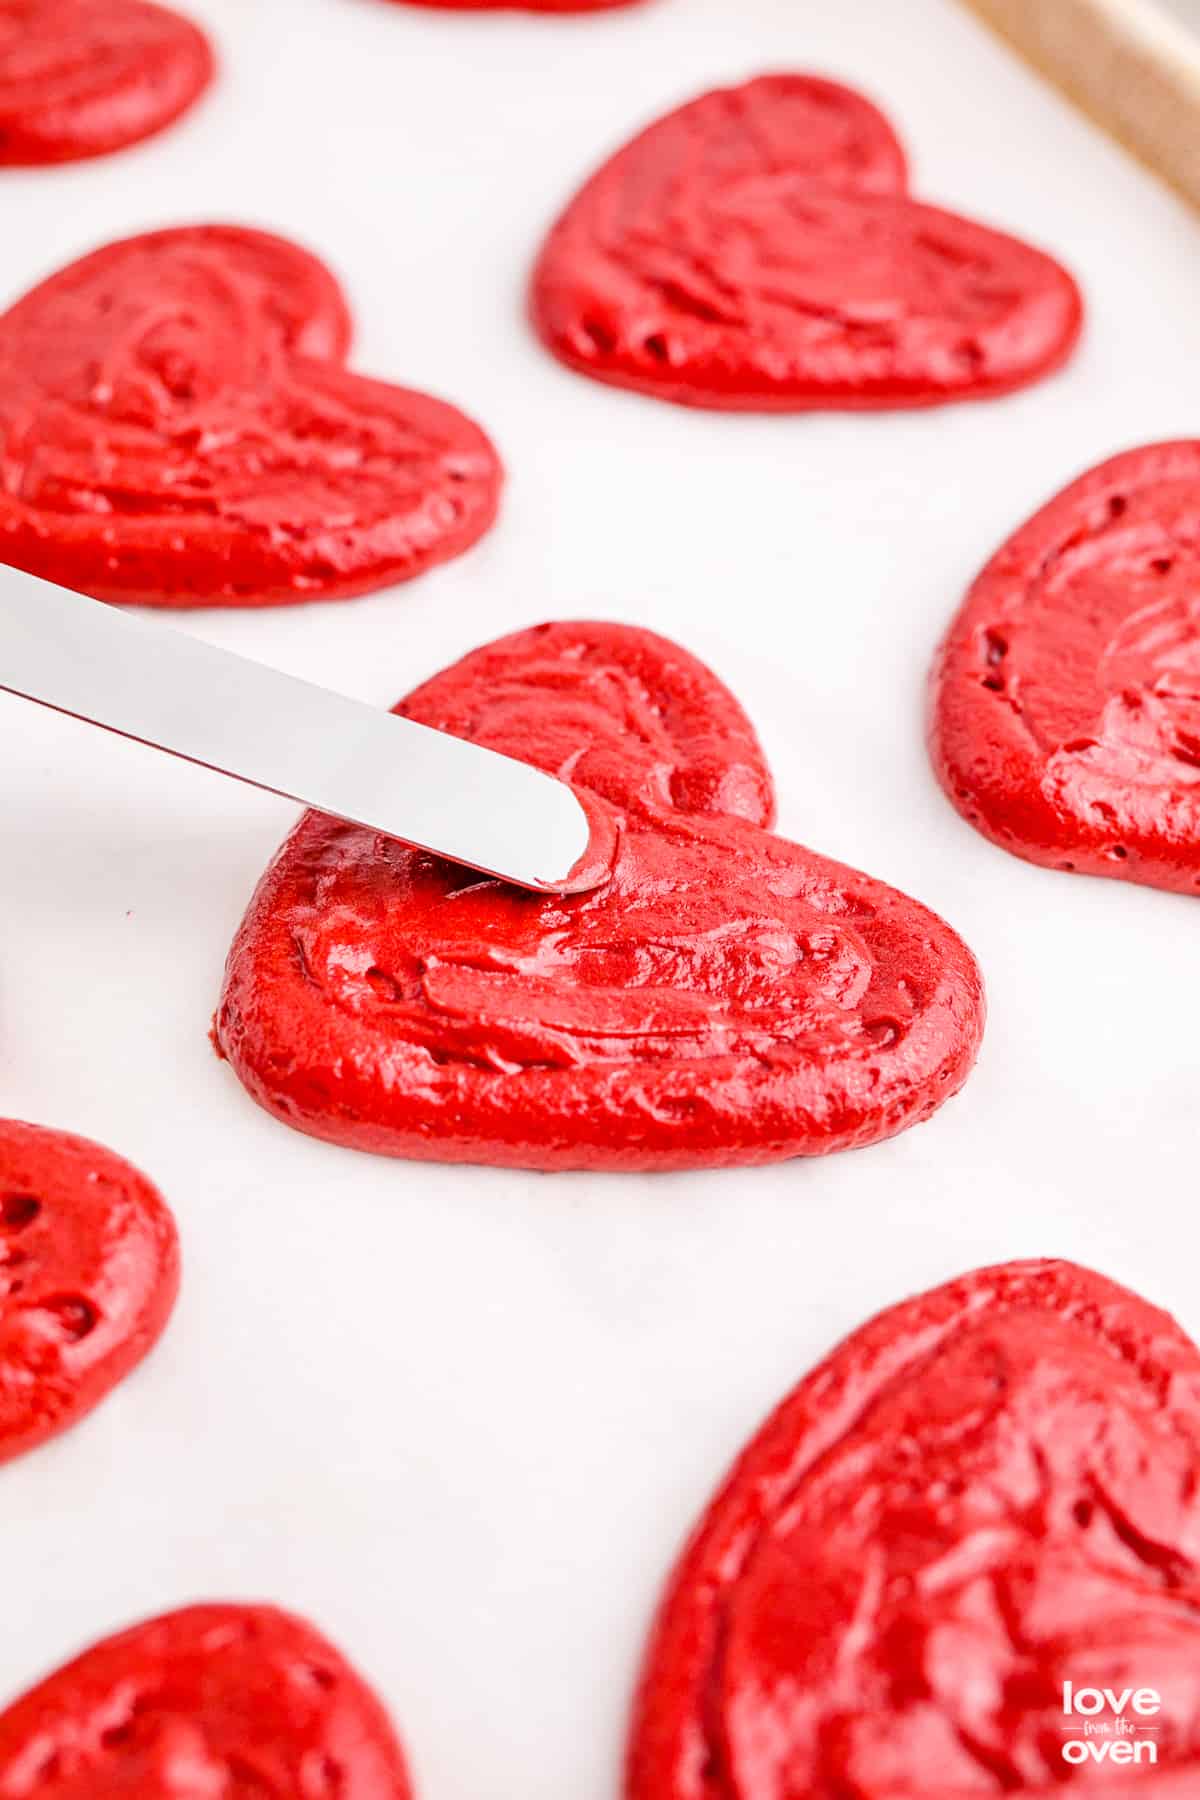
I find it easiest to pipe an outline of the heart and then fill it in then smooth out the batter a bit with a spatula. Bake the cookies for 10-12 minutes until completely set up. Allow them to cool slightly on the pan, then move them to a wire rack to cool completely.
How To Make Cream Cheese Filling
While the heart shaped cookies are cooling, make the filling.
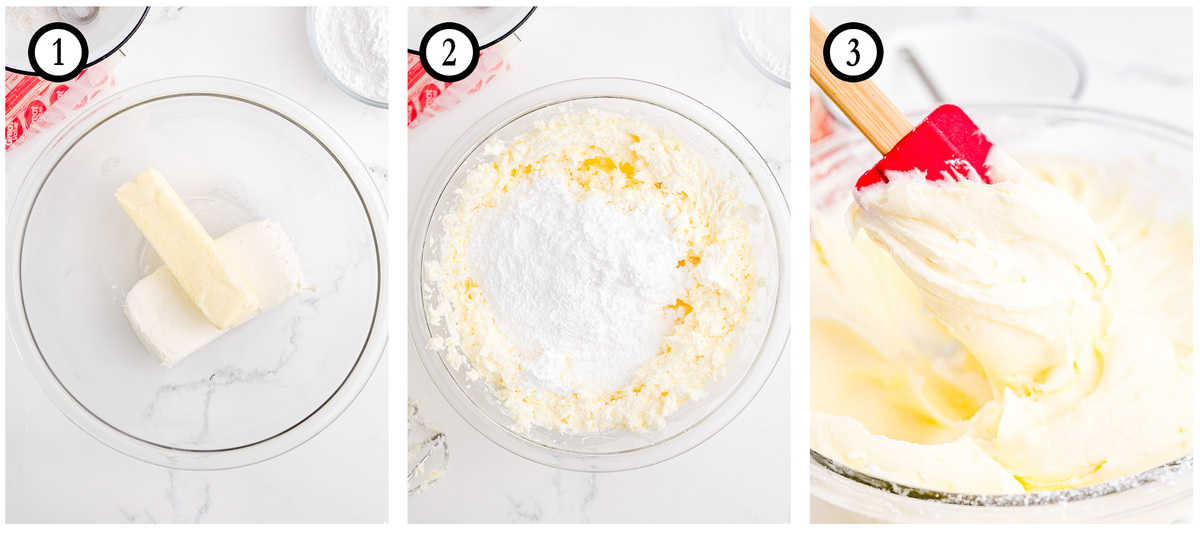
1. Beat the cream cheese and softened butter together until light and fluffy with an electric mixer, for approximately 2 minutes.
2. Add powdered sugar 1 cup at a time.
3. Beat for 1-2 minutes after each addition until light and creamy.
How To Assemble Whoopie Pies
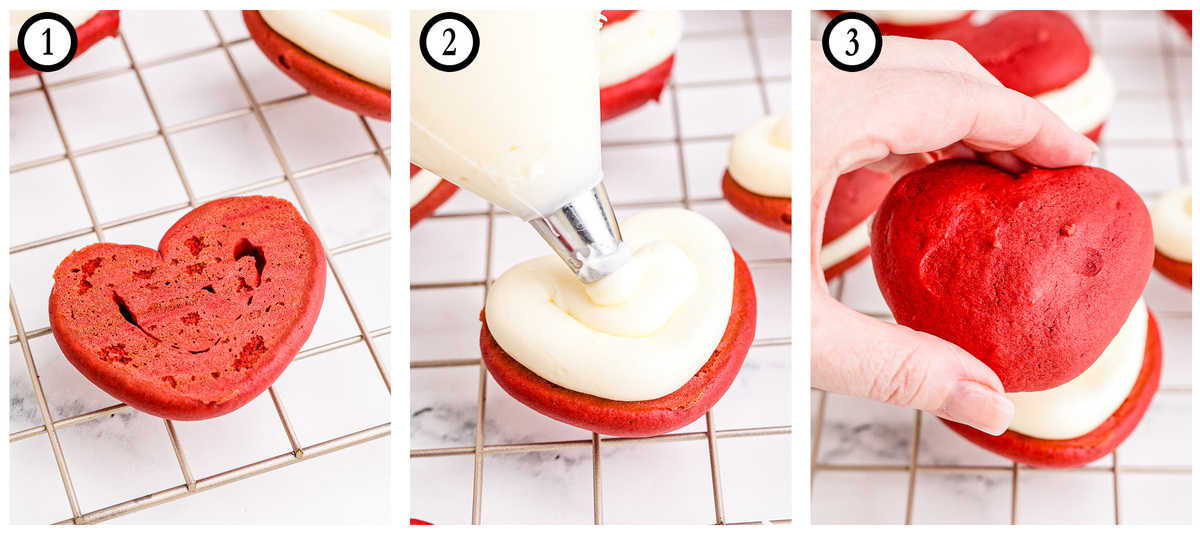
1. Allow cookies to cool completely before filling them. Match up pairs of cookies that are similar in shape and size.
2. Spread about 2 tablespoons of filling onto the flat side of one cookie.
3. Gently top the cream cheese with a matching cookie. Don’t squeeze too hard or the filling will likely squeeze out the sides.
Tips And Advice
Size: You want your heart shape to be about 2.5 inches across at the widest part. Since these cookies spread, they don’t need to be large when piped.
Storage: Due to the cream cheese filling, these whoopie pies must be kept in the refrigerator. Whoopie pies may be placed in an airtight container and stored in the fridge for up to a week. Or, you may freeze them for up to 3 months. It is best to store them wrapped individually for freezing
Recipe FAQs
These cookies look like fun, but a lot of work. Is there a shortcut?
You could use a premade cream cheese frosting to save some time if you like.
Supposedly whoopie pies were invented by the Amish, and Amish men would declare “Whoopie!” when they found them tucked into their lunch boxes.
In this case, due to the cream cheese filling, the answer is yes. That said, if you need a whoopie pie option that you don’t have to refrigerate, you can replace the cream cheese frosting with buttercream frosting, which will allow you to store them at room temperature.

More Valentine’s Day Recipes


Red Velvet Whoopie Pies
Equipment
Ingredients
- 1/2 cup butter (softened)
- 2/3 cup granulated sugar
- 2/3 cup brown sugar
- 2 eggs
- 1 cup buttermilk
- 4 tablespoons red gel food coloring (more or less can be used based on your preferences)
- 2 1/2 cups flour
- 1/4 cups unsweetened cocoa powder
- 1 teaspoon baking soda
- 1/2 teaspoon salt
- 1 teaspoon white vinegar
- 2 teaspoons vanilla
Cream Cheese Filling
- 8 ounces cream cheese (softened)
- 1/2 cup butter (softened)
- 2 1/2 cups powdered sugar
Instructions
- Preheat the oven to 350 degrees. Line 2 baking sheets with parchment paper.
- Stencil heart shapes all over the parchment paper, leaving about an inch of space between each. Flip parchment paper over so that the side with pencil marks will not be the side that the food touches*
- In a large mixing bowl, use an electric mixer to cream the butter and sugars together for at least 3 minutes on medium high speed until it is light and fluffy. Then, beat in the eggs until smooth. Next, add the buttermilk and food coloring and mix only until well combined, do not overmix.
- In a separate bowl, whisk together the flour, cocoa, baking soda, and salt. Once combined, add these ingredients to the wet ingredients. Mix together on low speed until mixed. Add in vanilla and vinegar, mixing just until combined. The batter will look more like cake batter than cookie batter.
- Place the batter into a piping bag with a Wilton 1A round tip. If you don’t have one, you could cut the corner out of a large zip-lock bag and this will work as well.
- Pipe the batter into heart shapes leaving about two inches of space between them. The cookies will spread while baking.
- Bake the cookies for 10-12 minutes until completely set up. Allow them to cool slightly on the pan, then move them to a wire rack to cool completely.
Cream Cheese Filling
- While the cookies are cooling, make the filling. Beat the cream cheese and softened butter together until light and fluffy with an electric mixer, for approximately 2 minutes. Add powdered sugar 1 cup at a time and beat for another minute or two after each addition until light and creamy.
- Allow cookies to cool completely before filling them. Match up pairs of cookies that are similar in shape and size. Spread about 2 tablespoons of filling onto the flat side of one cookie, then gently top it with a matching cookie. Don’t squeeze too hard or the filling will likely squeeze out the sides.
Notes
Nutrition
The nutrition facts provided are calculated using a third-party tool and are estimates only. Actual nutritional content may vary based on the ingredients and brands you use, as well as portion sizes. For accurate results, please consult a registered dietitian or nutritionist.

Meet Christi, Love From The Oven
I’m Christi I love sharing easy & delicious recipes that your family & friends will love. I’m a mom, baker, cookbook author and lover of sprinkles.


Recipe doesnt work. i ended up with a runny mixture, far too much buttermilk
Oh my goodness, you are correct, that was a typo. I feel so bad, if you want to reach out to me, I’d love to venmo/zelle/paypal you to reimburse you for that mistake.
Are the cookies soft or crisp??
Soft
Awesome she loved them thanks