No Bake Christmas Wreath Cookies are the perfect, easy Christmas treat that won’t leave you messing with the oven or worrying about baking times. Crunchy, sweet, and colorful, these 7 ingredient, no bake cookies are something you must make this holiday season. Share these adorable, yummy Christmas cookies with friends and family, or keep them all for yourself!

Reasons You’ll Love This Recipe
Store Bought – No need to turn on your oven for this recipe. Buy these cookies already made and skip straight to the decorating.
Get Fancy – If you love the decorating part of making Christmas cookies, then you’re in luck with this recipe; It’s all decorating!
Picture Perfect – Have I mentioned yet that these cookies are just dang adorable?
Great For Kids – This recipe is a cheap and easy way to start your kids on their cookie decorating careers.
If you love the Keebler cookies plain, just wait until you try these upgraded, adorable little treats. They’re perfect to put out for guests, or to wrap up as a little gift this holiday season. Not to mention how easy these are to make!
Ingredients and Substitutions
Recipe Discussion
Let’s discuss how to make this recipe, as well as the ingredients that are needed. Please take note that below you will find discussion, expert tips, and answers to frequently asked questions about this recipe to help you recreate it in your kitchen. If you *just* want the recipe itself, scroll down. The full printable recipe itself, with exact measurements and instructions, is found at the bottom of this page.
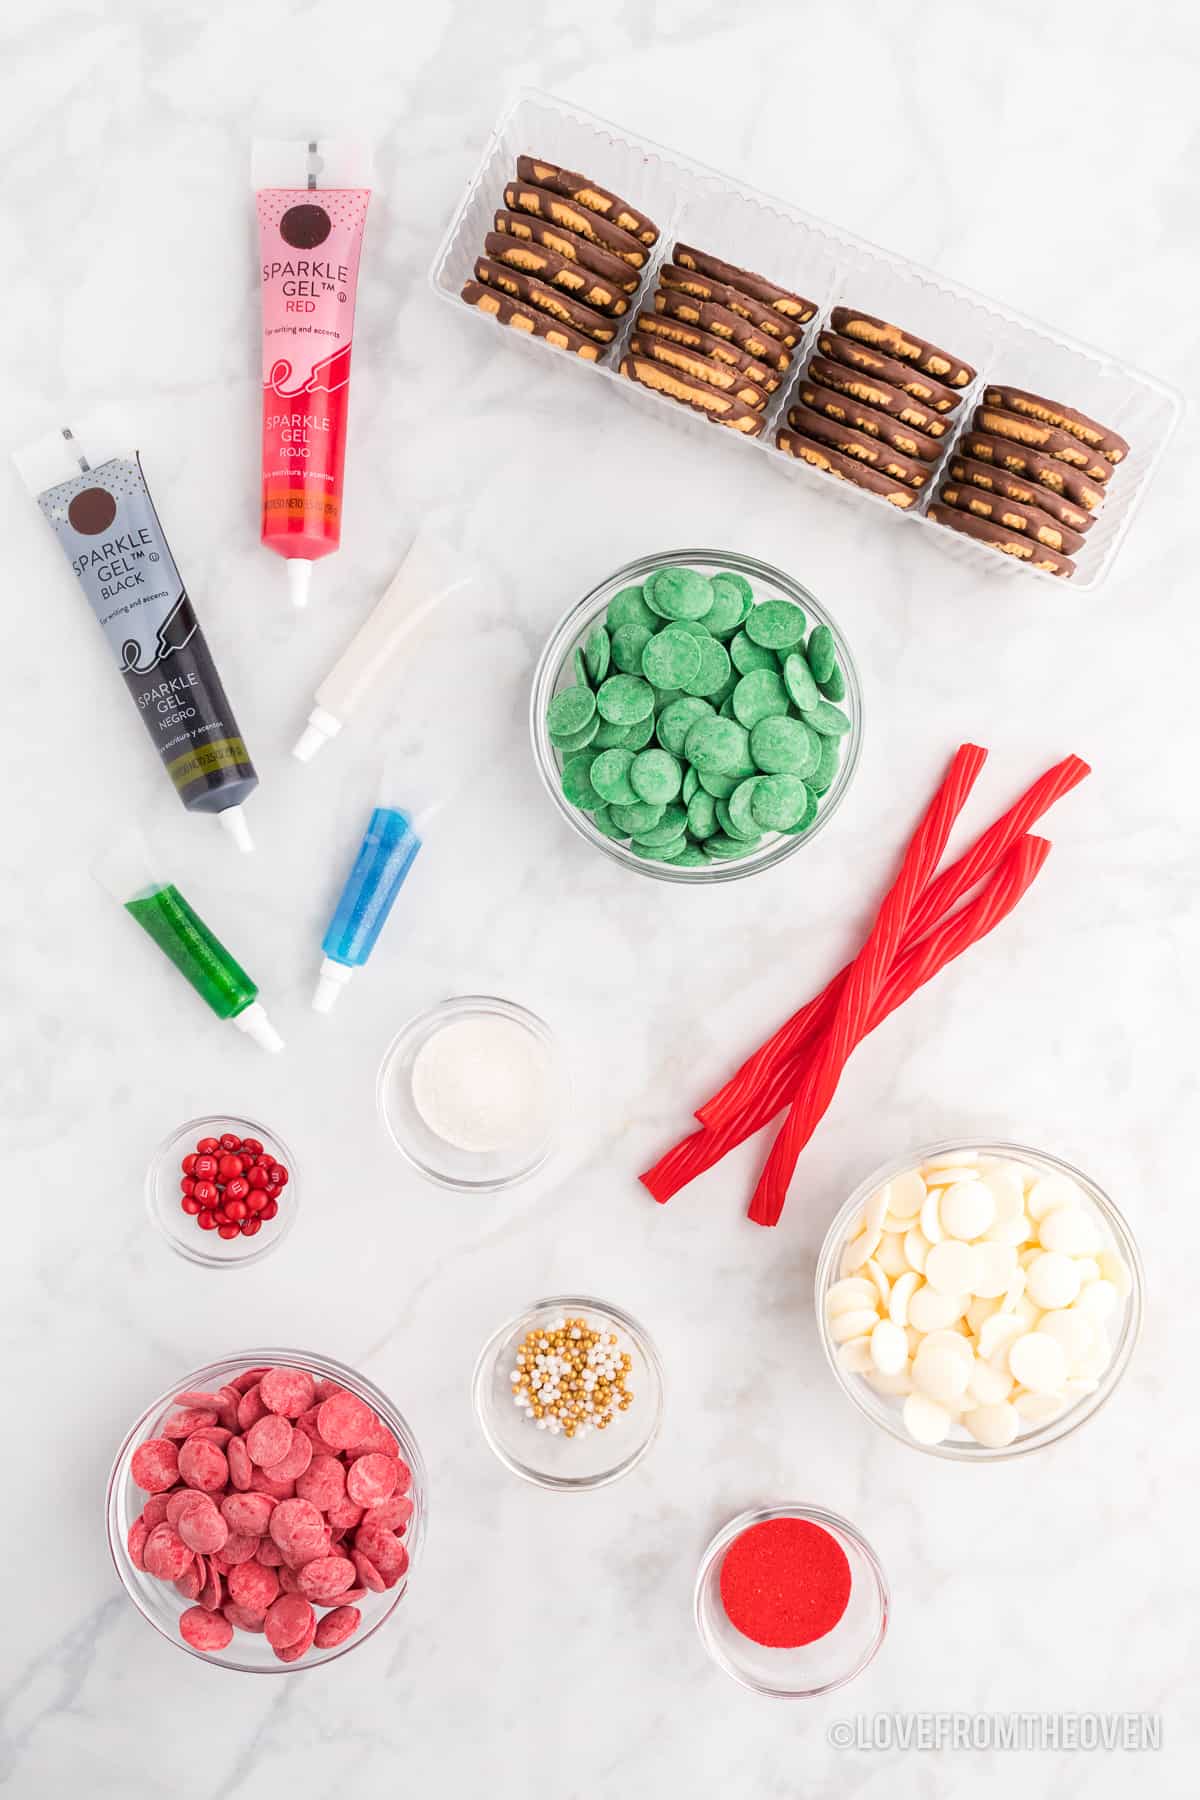
Candy Melts – For this recipe, the colors used were green, red and white candy melts. Feel free to use whatever color candy melts you’d like. If you find the candy melts are too thick, you can add a teaspoon of vegetable shortening as needed.
Fudge Striped Cookies – This recipe uses the Keebler brand, but they have generic brands you can use as well. These are the best cookies to use because the hole in the middle makes them look like a wreath.
Edible Glitter – Edible glitter or sparkle gel would be best for this recipe.
Mini M&Ms – This recipe only needs red M&Ms, but use whatever color you want.
Gold and White Beads – The Wilton 4-Cell Gold Sprinkles Mix are the perfect size!
Sanding Sugar – I used red and silver sanding sugar, but use any color you see fit.
Pull and Peel Licorice – You’ll twist a strand of licorice into a small bow. To make a licorice bow, take a strand of licorice and grab one end of it and make a small loop. With the other end, make another small loop then cross the middle sections like an ‘X’ to make a bow. Press the bow together so it sticks, and trim excess if needed.

How To Make No Bake Wreath Cookies
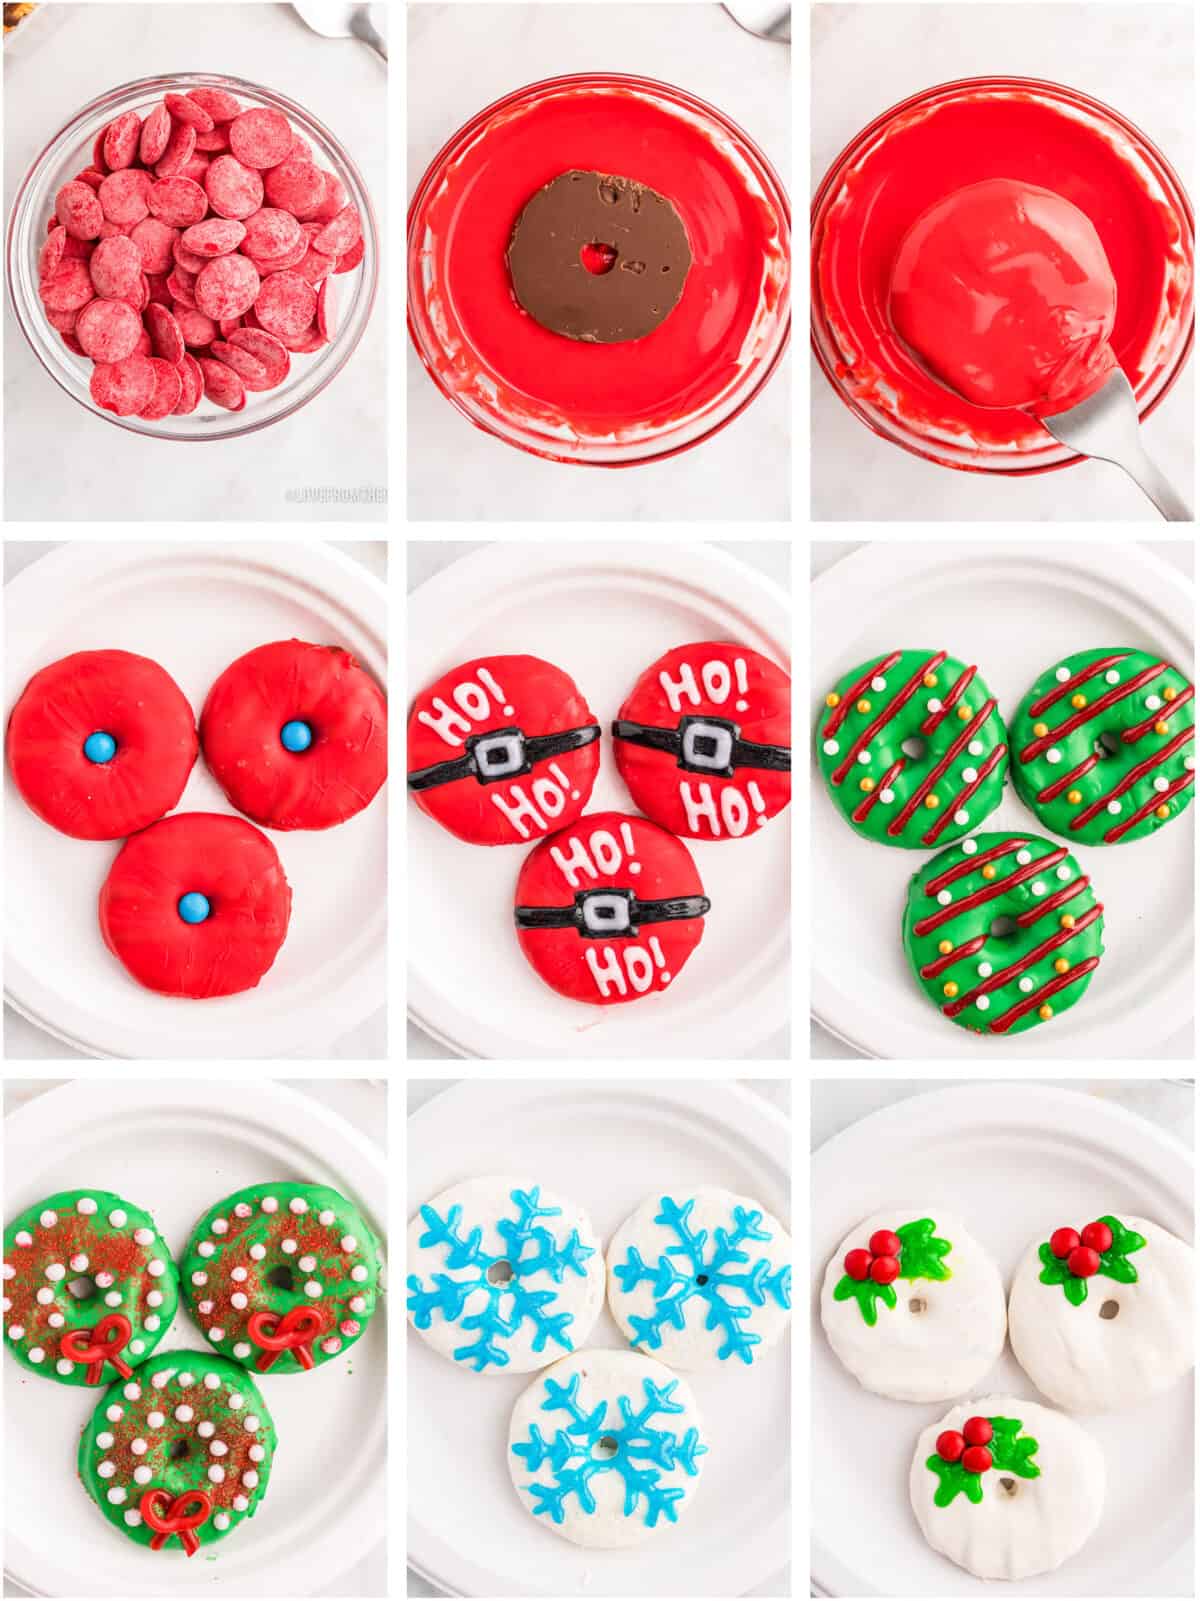
- Start by lining a baking sheet with parchment paper. Set this aside and have your toppings out and ready to assemble. Make 8 bows out of the licorice strands. In a small microwave safe bowl, add 1 ½ cups of one color candy melt. Heat the candy melts according to the package, stir them together and make sure the melts are smooth.
- Grab a fudge striped cookie and drop the cookie top side down into the melted candy melts. Using a fork, flip the cookie over in the chocolate so the whole cookie is covered with chocolate. Pick the cookie up out of the chocolate with a fork and let the excess chocolate drip off the cookie. Make sure the top of the cookie is smooth.
- Place the cookie on the parchment lined baking tray and decorate the cookie while the chocolate is still warm. Scroll further down in the recipe to see how to decorate each design. Repeat steps 1-3 for each color of candy melts you use. When you’re finished decorating, let the cookies sit and cool completely so the candy melts harden. You can put the cookies in the fridge for 10 minutes if you need them to cool faster. Serve and enjoy!

How To Decorate The Santa Belt Cookies
- To a warm red candy melt coated cookie, put an M&M into the hole in the center of the cookie so the gel doesn’t fall through.
- Use black glitter gel icing to draw a belt across the center of the cookie. Fill in the center of the buckle. Next, use the white glitter icing to add highlights to the buckle. You can then write the words “Ho! Ho!” on the cookie in white if you’d like.
How To Decorate The Gold & White Wreath
- To a warm green candy melt coated cookie, draw lines using the red glitter gel icing then and add gold and white beads.
How To Decorate The Bow Wreath Cookies
- To a warm green candy melt coated cookie, add a licorice bow to the bottom of the cookie then sprinkle red sanding sugar on the cookie. Lastly, add dots to the cookie with the white glitter gel icing.
How To Decorate The Snowflake Cookies
- To the warm white chocolate coated cookie, sprinkle on the silver sanding sugar then use a blue glitter gel icing to pipe a snowflake shape.
How To Decorate The Holly Cookie
- To a warm white chocolate coated cookie, use a green glitter gel icing to draw the leaves, then add 3 red M&Ms to the center of the leaves.
How To Make The Green and White Striped Cookie
- To a warm red candy melt coated cookie, draw alternating lines of green and white glitter gel on the cookie, then add a licorice bow to the bottom.
Recipe Tips & Advice
Storage – You can store the decorated cookies in an airtight container for up to two weeks at room temperature. The glitter gel does not harden, so be careful stacking the cookies, it may ruin the design.
Equipment – For this recipe, you’ll need a baking sheet, parchment paper, microwave safe bowls and a fork.
Dip Like A Pro– The dipping process works best when you dunk 2-3 cookies at a time then decorate them while they’re still warm. Continue doing 2-3 at a time until you want to move onto another color candy melt. When dipping the Keebler cookies in the white chocolate, the milk chocolate on the bottom of the cookie may turn the white chocolate brown. To avoid this you can spoon the white chocolate on the bottom of the cookie when you start dipping them.

Recipe FAQs
If you can’t find any colored candy melts, you can use white chocolate, or white almond bark and use colored food gel to dye them whatever color you desire. Make sure you use food gel though, food coloring will water down the chocolate.
Yes, once you’re done using the candy melts, you can let them cool completely and keep them in a zip up bag or an airtight container. Store the leftover candy melts somewhere cool and dry, but don’t refrigerate them or else they won’t re-melt.
Using a utensil like a fork to help you dip the cookies will assist you in making picture perfect cookies.
More Festive Recipes To Try
Only a few more days until Christmas, which means you have a few more days to try out more easy, and delicious recipes! Check out a few more festive and fun recipes below.
- Christmas Oreos
- Oreo Truffles
- Chocolate Covered Ritz Crackers
- Chocolate Covered Pretzels
- Easy Christmas Pretzels
- No Bake Peanut Butter Balls
- Peppermint Oreo Bark


No Bake Christmas Wreath Cookies
Ingredients
- 1 package Keebler Fudge Striped Cookies other brands will work fine
- 3 12 ounce packages of different color candy melts red, green and white
Instructions
- Start by lining a baking sheet with parchment paper. Set this aside and have your toppings out and ready to assemble. Make 8 bows out of the licorice strands.
- In a small microwave safe bowl, add 1 ½ cups of one color candy melt. Heat the candy melts according to the package, stir them together and make sure the melts are smooth.
- Grab a fudge striped cookie and drop the cookie top side down into the melted candy melts. Using a fork, flip the cookie over in the chocolate so the whole cookie is covered with chocolate. Pick the cookie up out of the chocolate with a fork and let the excess chocolate drip off the cookie. Make sure the top of the cookie is smooth.
- Place the cookie on the parchment lined baking tray and decorate the cookie while the chocolate is still warm. Scroll further up in the recipe to see how to decorate each specific design, with photos. Repeat steps 1-3 for each color of candy melts you use. When you’re finished decorating, let the cookies sit and cool completely so the candy melts harden. You can put the cookies in the fridge for 10 minutes if you need them to cool faster. Serve and enjoy!
Notes
Disclaimer
Nutrition information is estimated as a courtesy. If using for medical purposes, please verify information using your own nutritional calculator. Percent Daily Values are based on a 2000 calorie diet.


Leave a Reply