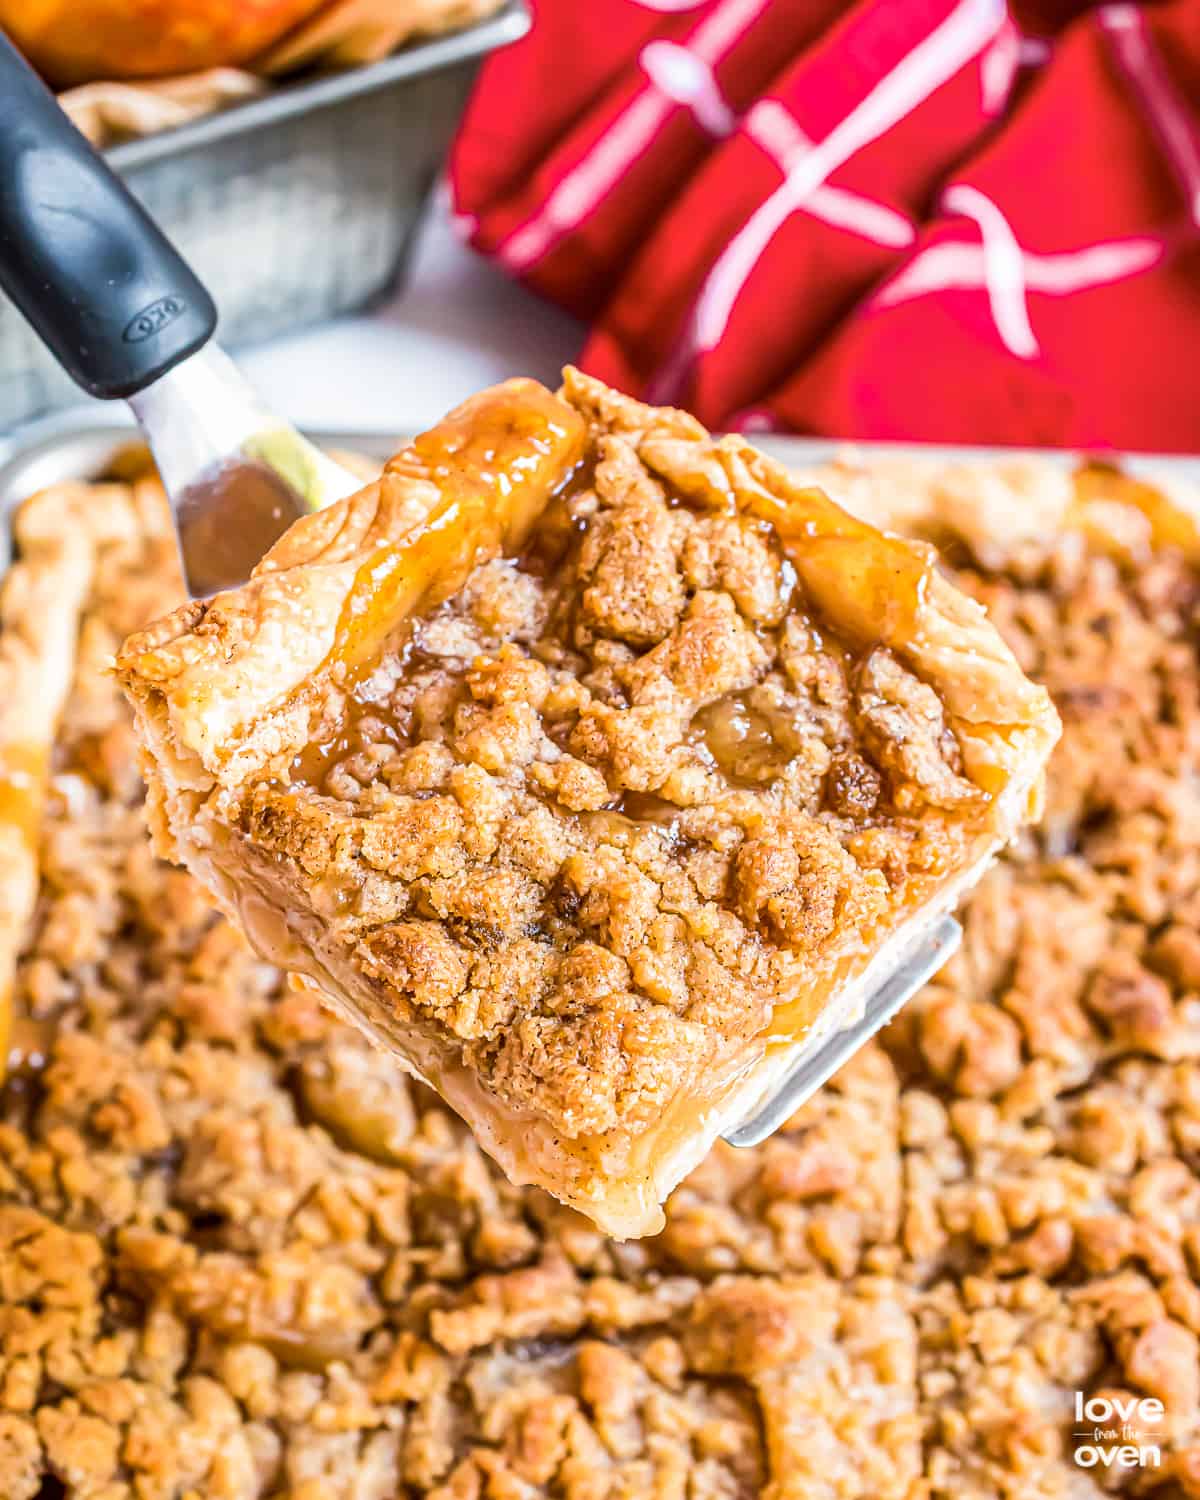
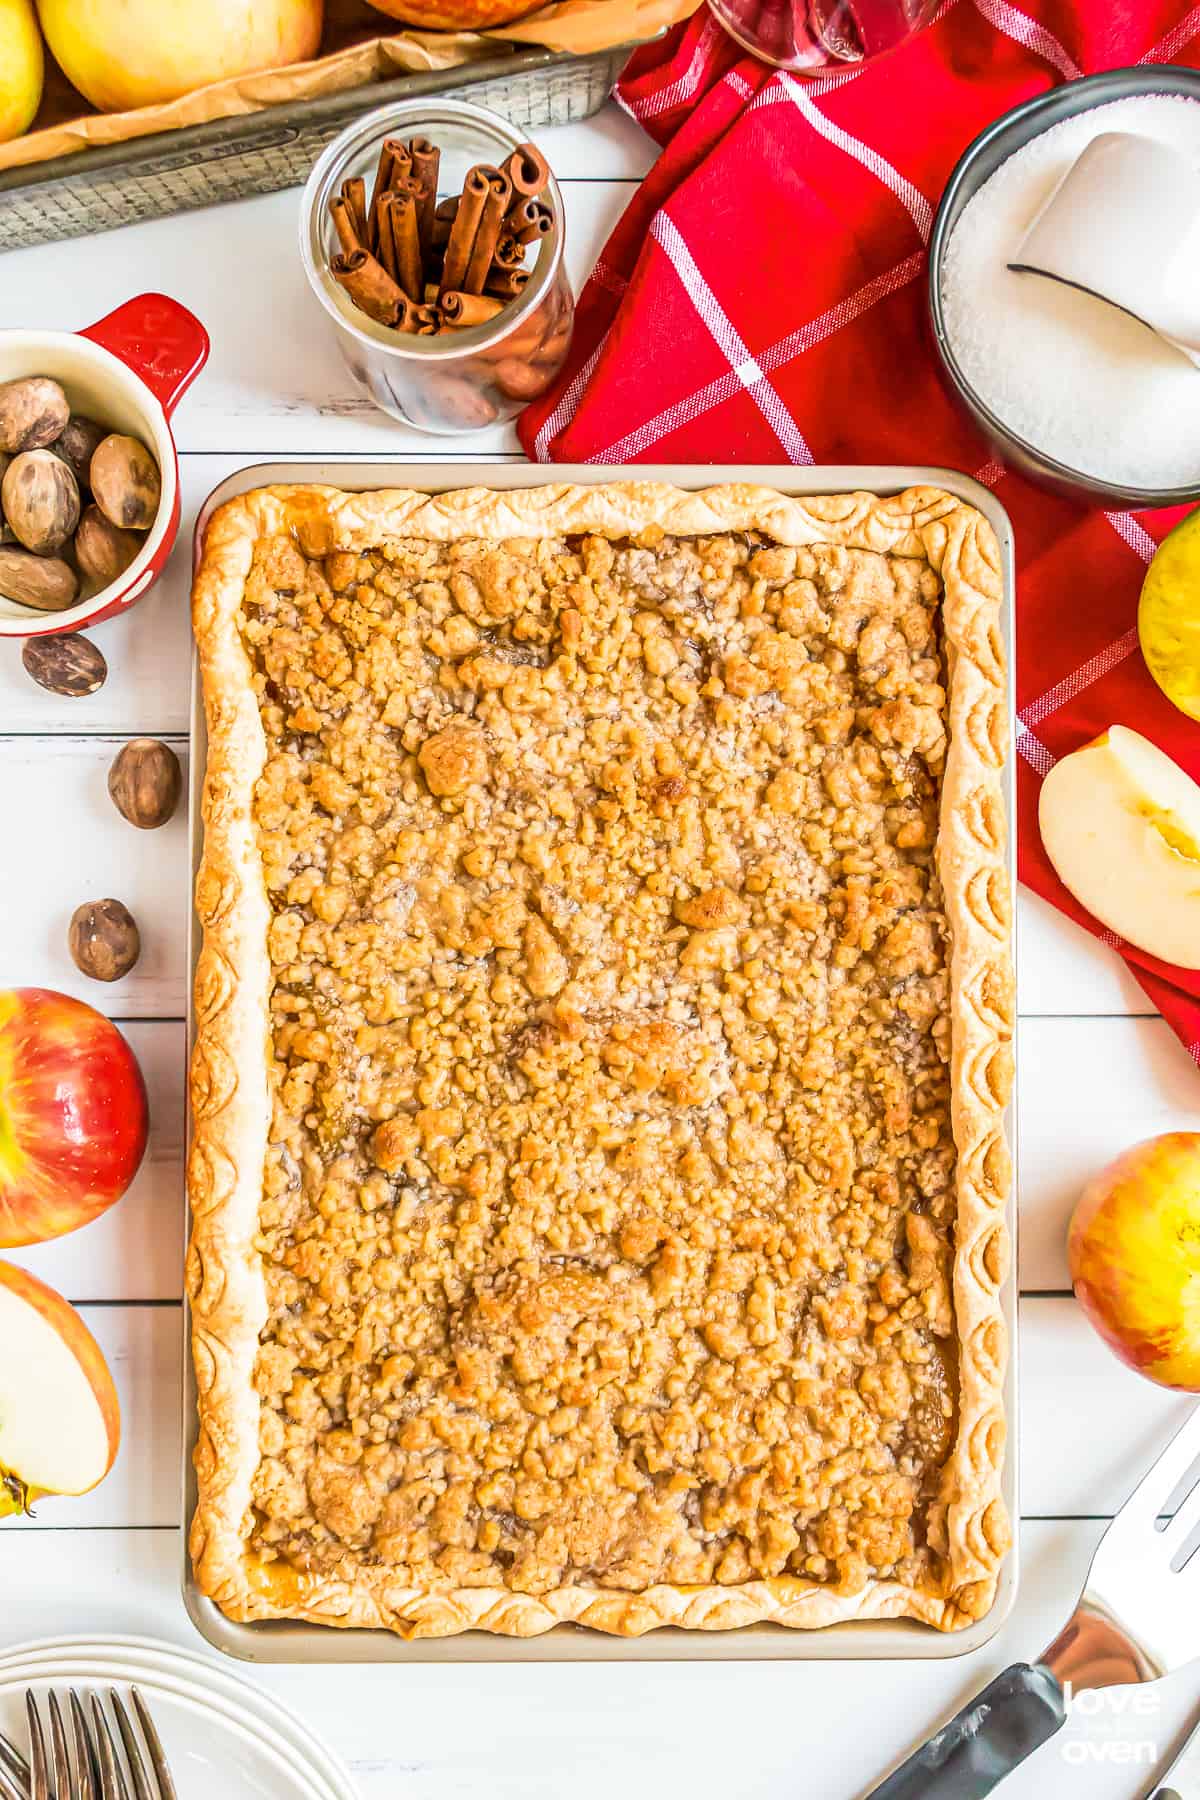
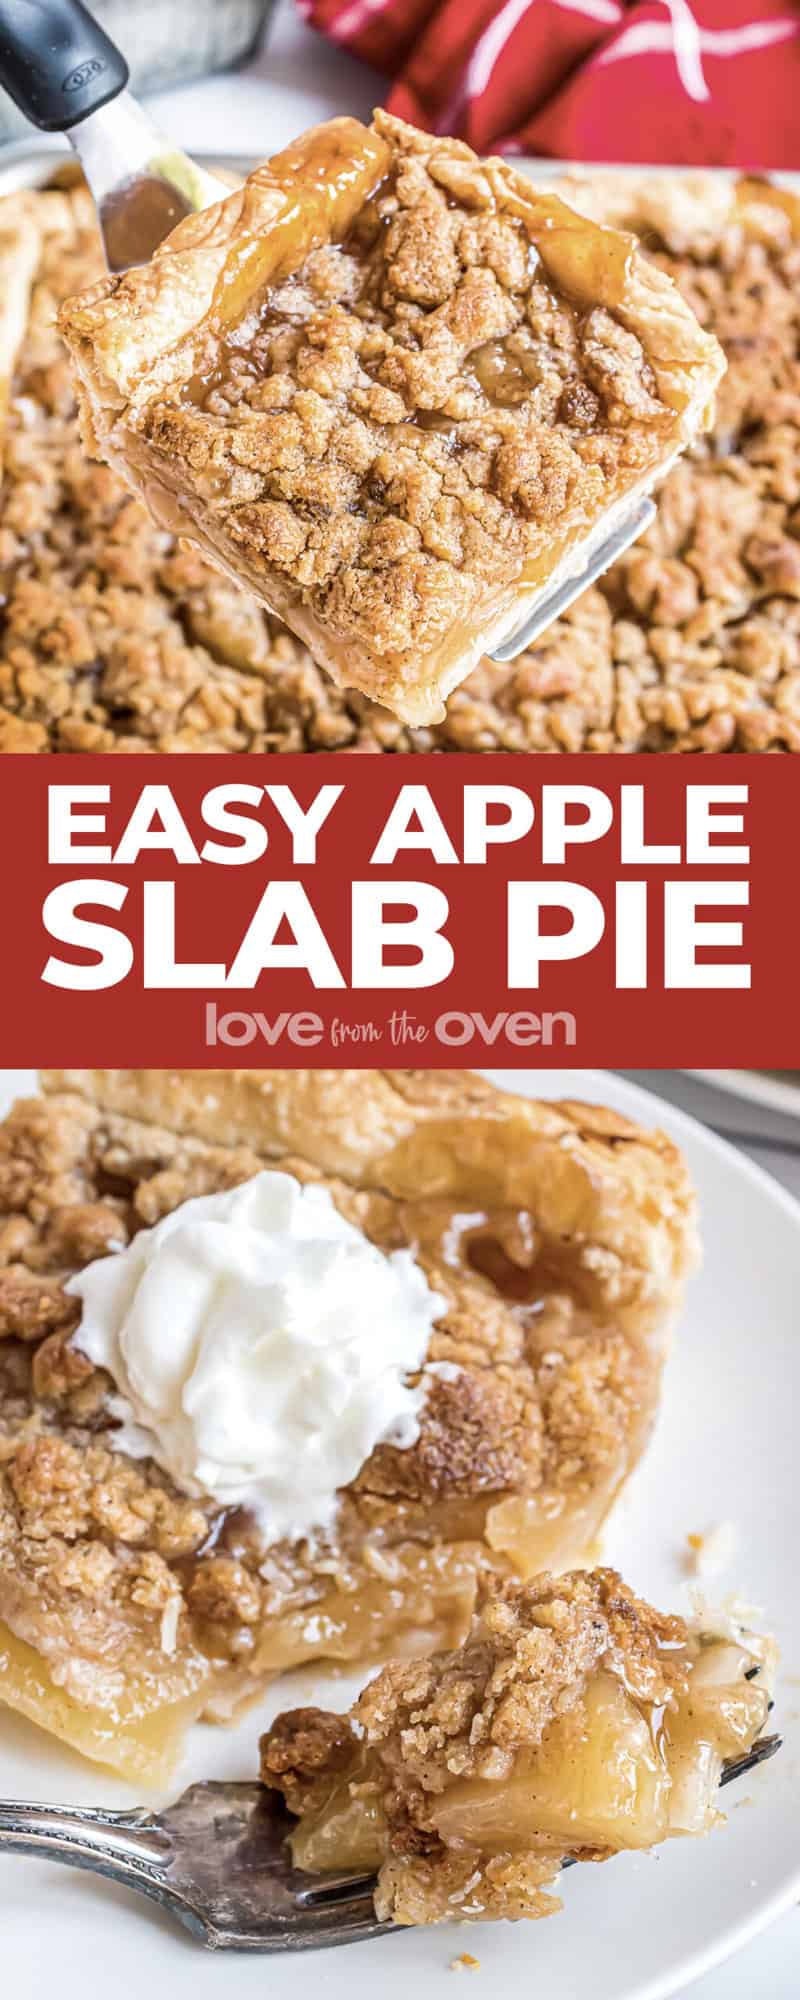
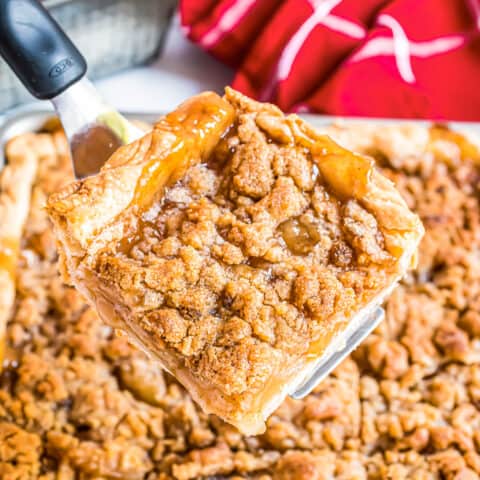
Apple Slab Pie is an easy twist on a classic dessert. Sweet apple pie filling is surrounded by a simple store bought pie crust, then topped with a buttery, homemade crumb topping. The result is a delectable, melt-in-your-mouth dessert that will bring smiles to your entire crowd.
Email This Recipe
Reasons You’ll Love This Recipe
Easy as Pie – This recipe is very simple to make and only requires a handful of ingredients.
Short Cut Ingredients – Nobody will guess that you got a little help making this pie, thanks to canned apple pie filling and premade crusts. The presentation and flavor both scream homemade!
From Scratch Option – While this recipe is made to be quick and easy, you can also use your favorite homemade pie crust and apple pie filling recipes if you like, it’s flexible!
Slice Me Up! – If you’re terrible at cutting a pie into even triangle slices, you don’t have to worry about that with this recipe!
Yummy Year Round – The great thing about this recipe is that you can make it year round and keep it in your recipe book for any gathering, potluck or after dinner craving.
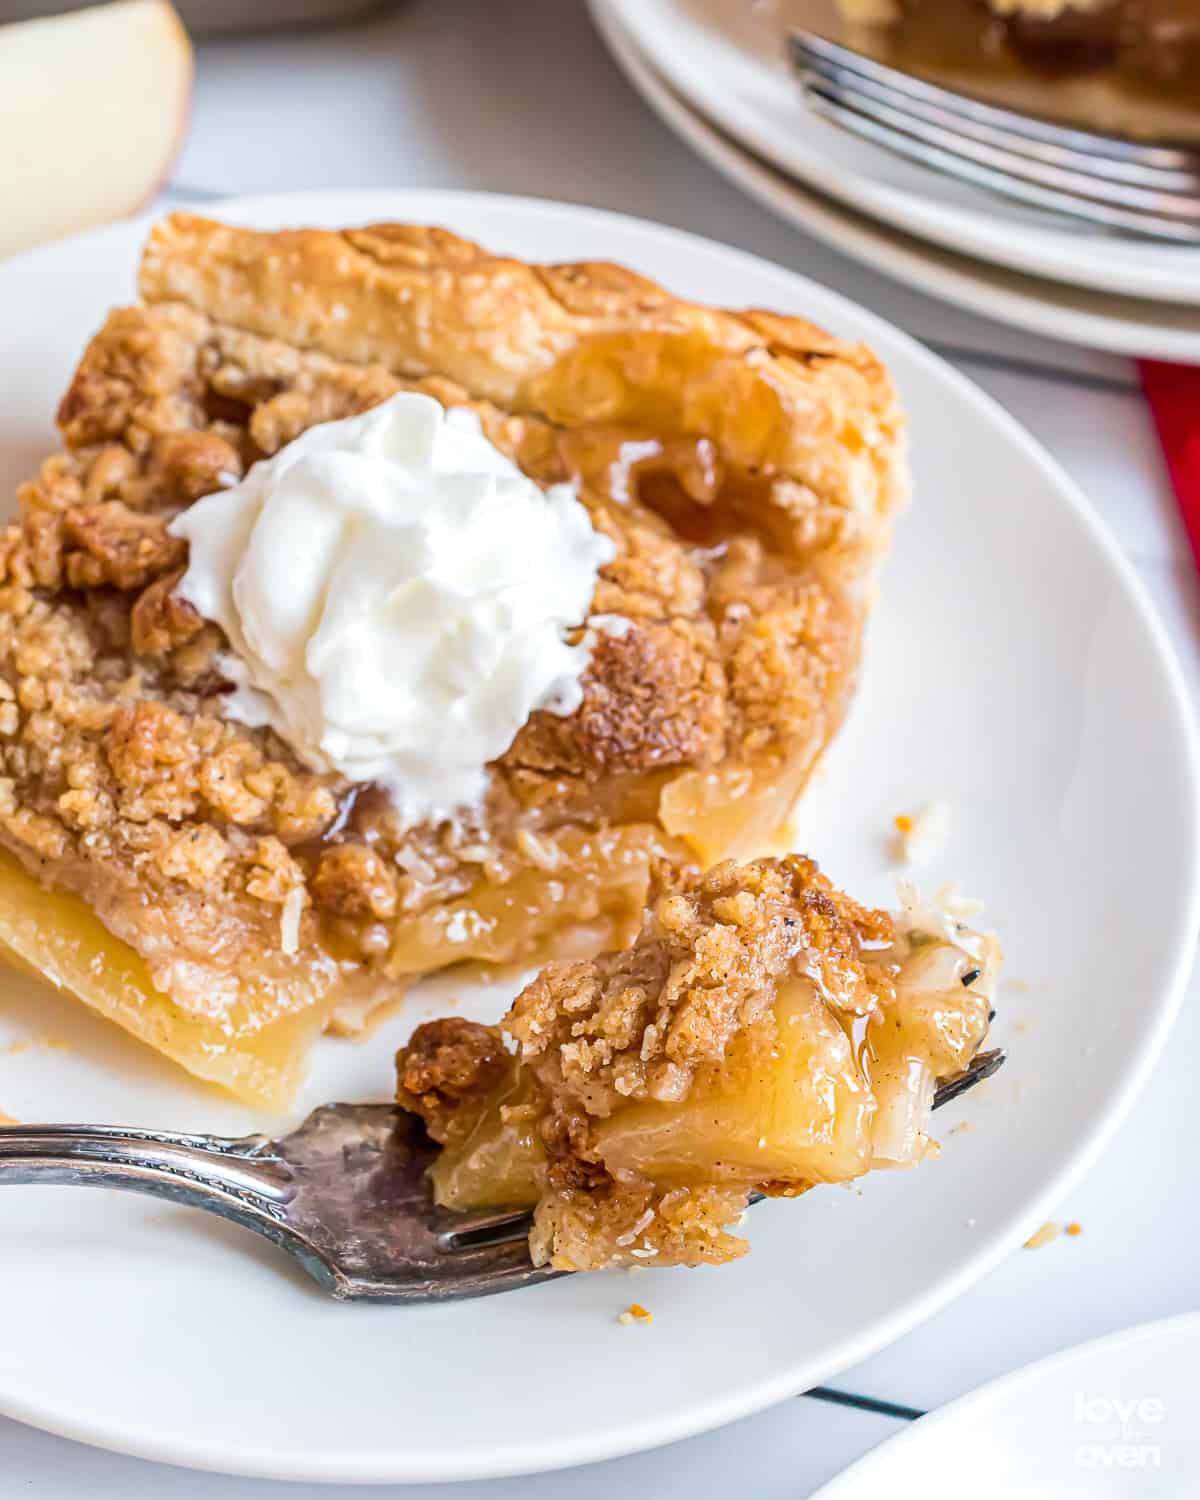
Toppings – Drown a slice of this slab pie in some whipped cream, ice cream, caramel sauce, nuts, or anything your heart desires.
No Lattice No Problem – Lattice haters unite! This pie calls for a homemade crumble-like topping so no need to make it look perfect.
With the holiday season upon us, you might find yourself baking for a crowd. This Apple Slab Pie is perfect for serving to a large group, and it’s easy as, well, pie to make. Holidays can be hectic, and I love this short cut time saver recipe that brings homemade results.
If you don’t own a pie dish, but want to try your hand at making a pie, this apple pie with canned filling recipe was made for you. Don’t worry about lattice cutting or forming a perfectly round pie shape. Instead, focus on how dang-good this is gonna taste!
Ingredient Notes and Substitutions
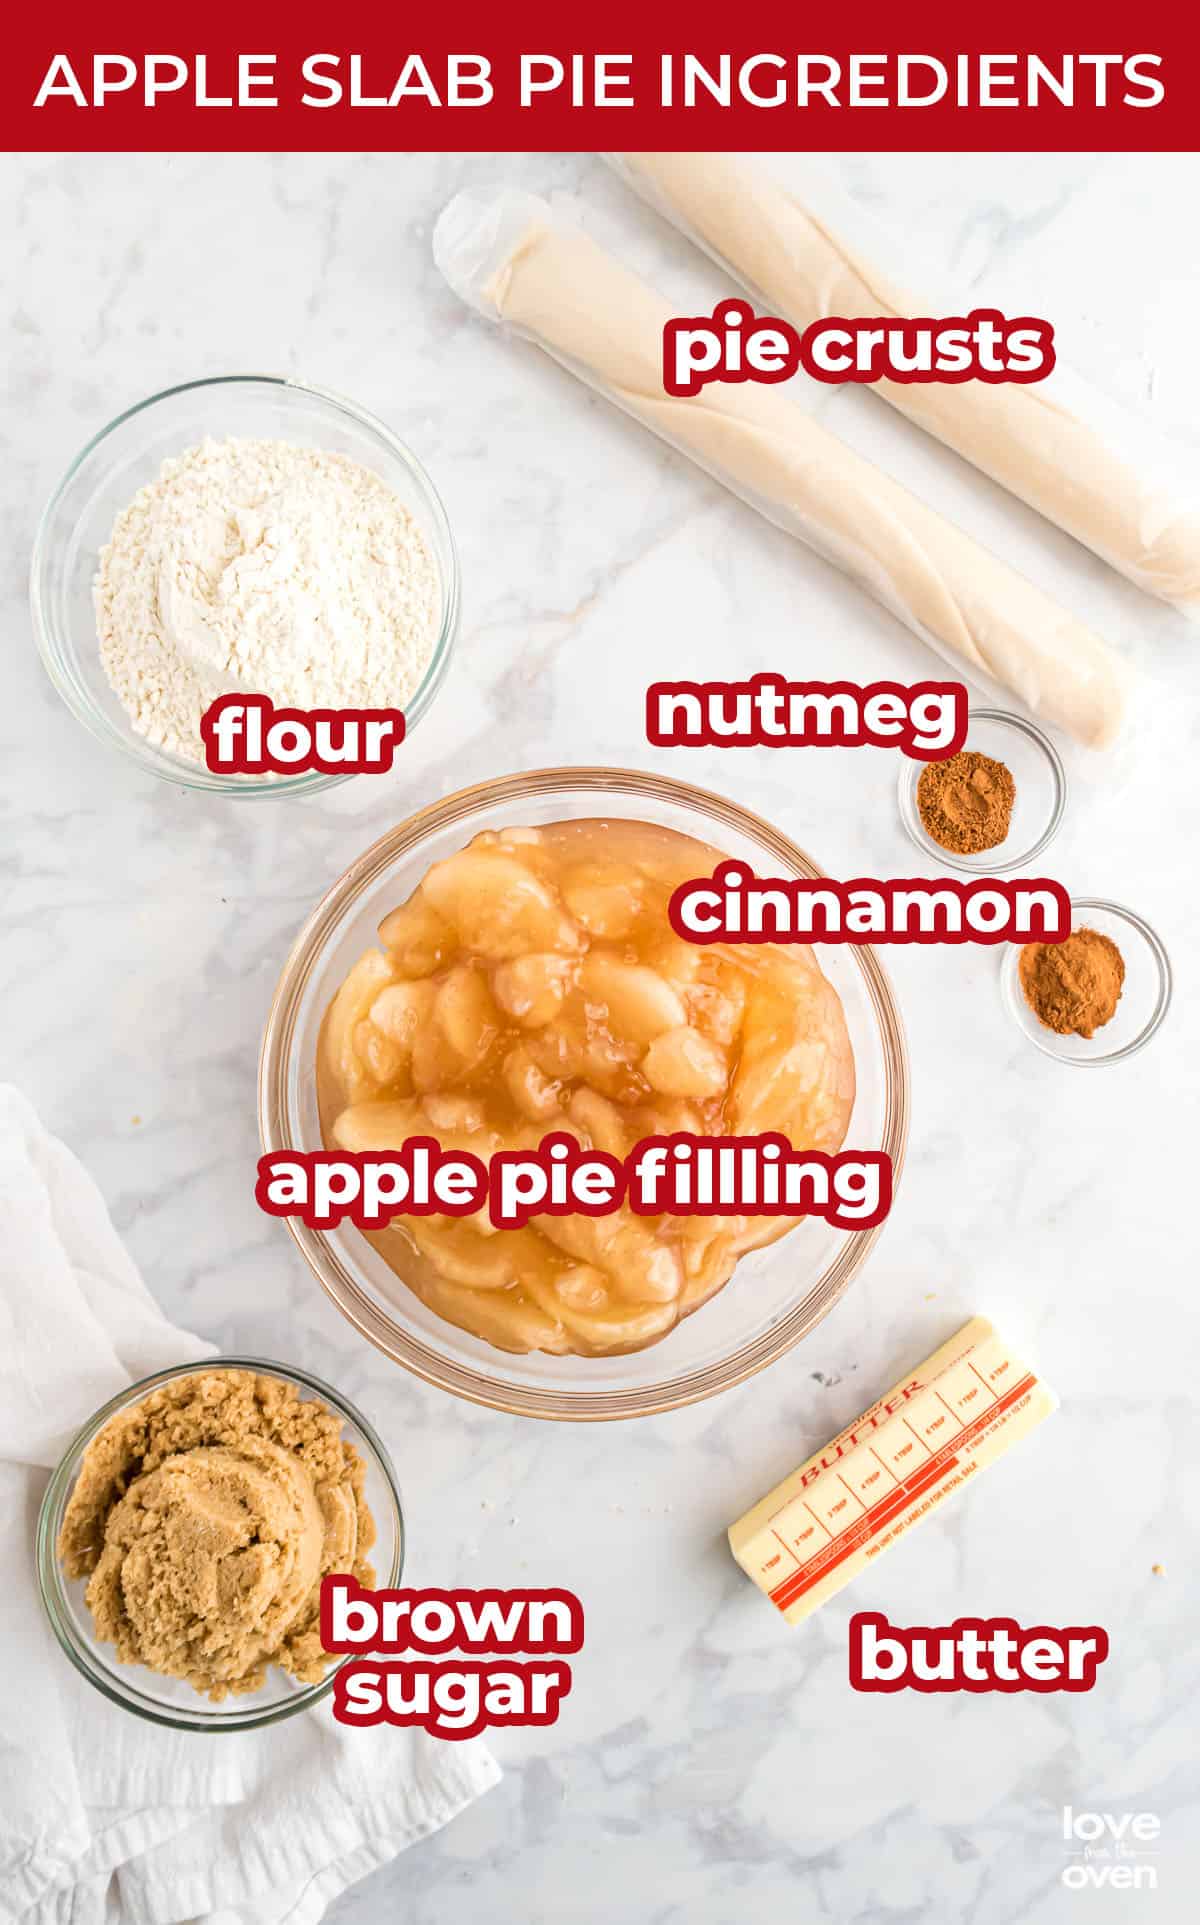
Pie Crusts – I am a HUGE fan of store bought refrigerated pie crusts. We are talking about the kind that come in a box that you roll out, not the pre-formed pie shells. I use them all the time, and I constantly get compliments on my delicious pie crusts. That said, I have found that the Pillsbury Crusts are the best. Normally I don’t find a lot of difference between brands on most things, but for this – go with the Pillsbury if you can. This isn’t sponsored in any way, they just perform and taste the best.
Make sure to follow any instructions in terms of thawing the crusts that is listed on the package. Until you’re ready to use them, make sure they stay in their package to prevent drying. If you have a recipe for a homemade pie crust feel free to use that instead.
Apple Pie Filling – Any canned version will work great. I typically go for the Duncan Hines Comstock canned apple pie filling. If you have a homemade recipe you’d like to use, that works as well.
All Purpose Flour – This will be used for the crumbs on top.
Brown Sugar – Make sure to measure the brown sugar packed tight before adding it to the topping.
Unsalted Butter – You’ll want to make sure the butter is cold, otherwise the ingredients in the topping won’t form into crumb pieces. While the recipe calls for unsalted butter, you can absolutely use salted as well.
How To Make Apple Slab Pie
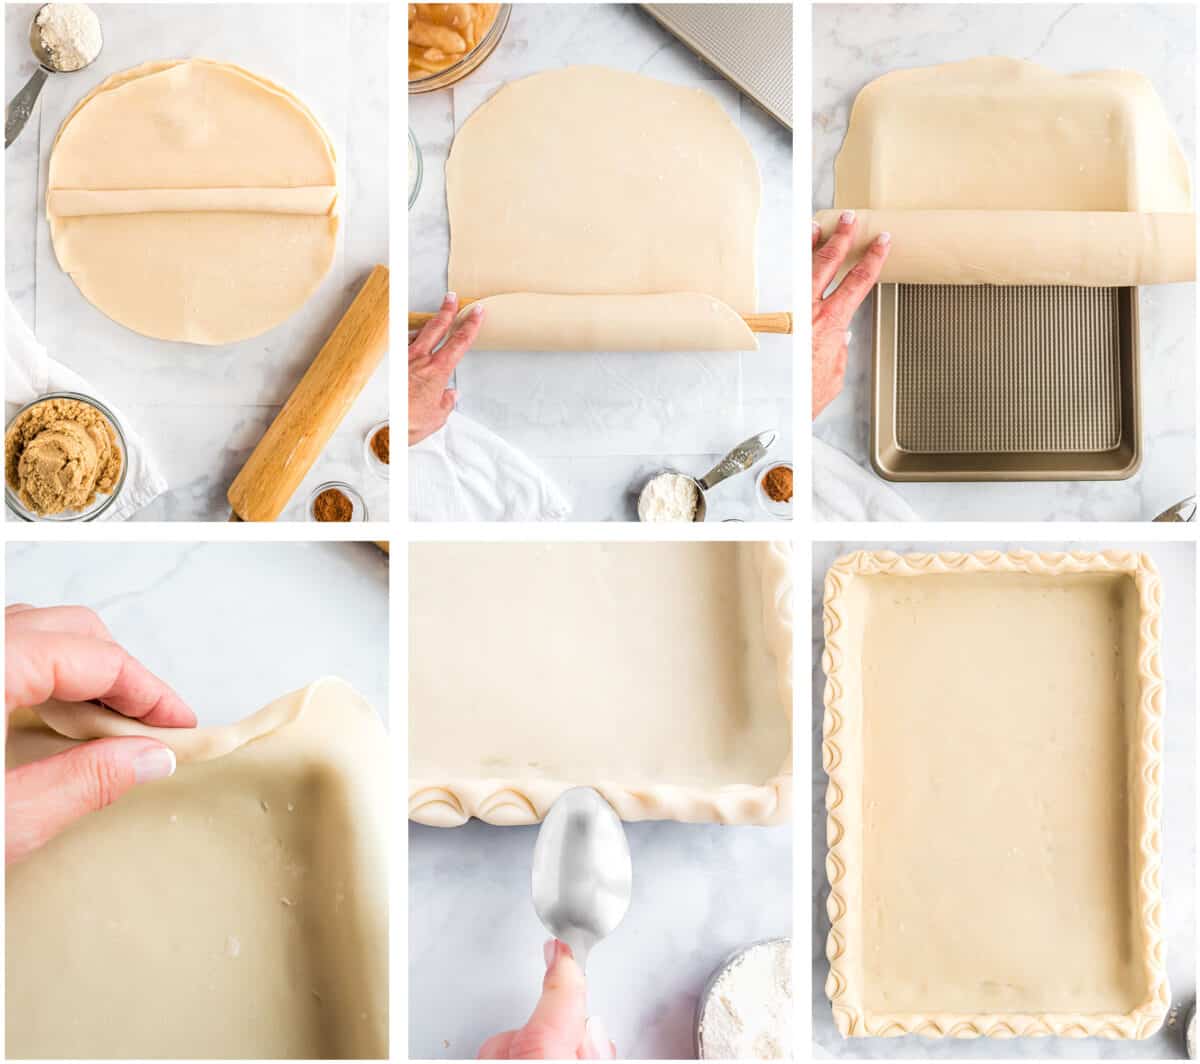
- Start by preheating the oven to 400°F. Move the oven rack to the lower third of the oven to prevent the bottom of the crust from getting soggy. Next, lightly flour a flat surface and roll out your two pie crusts on top of each other.
- Using a rolling pin, roll the pie dough into a rectangle shape that is 17’ long and 14” wide.
- Once rolled out, pick up the pie dough by rolling it around the rolling pin gently, and securing it with your hand. Then, unroll it over a 9”x13” quarter sheet pan guiding it with your hand as it unrolls.
- Roll the ends of the pie dough inwards towards the center creating a crust/edge.
- Using the inside of a spoon, create a pattern on the crust along the edges on the pan. (This step is optional; you can just leave it rolled or trim the edges.)
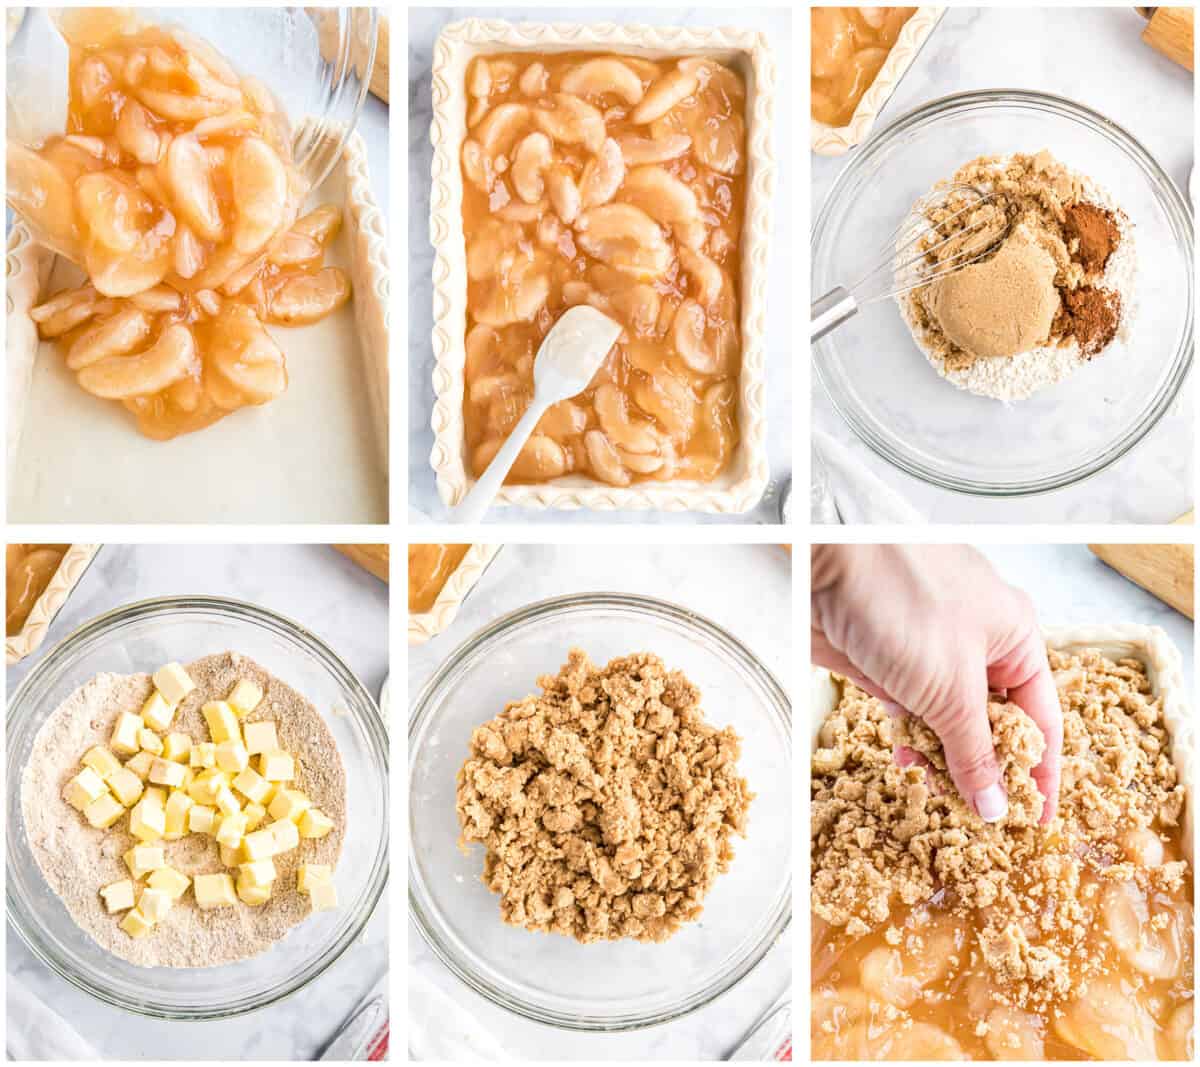
- Pour the canned apple pie filling into the center of the pie crust
- Spread the filling around with a spatula to even it out, then start on the topping.
- To a bowl, add the flour, brown sugar, cinnamon, and nutmeg and combine.
- Slice your cold butter into cubes and add it to the flour mixture.
- Using either your hands or a pastry cutter, combine the mixture until it reaches a crumb-like consistency.
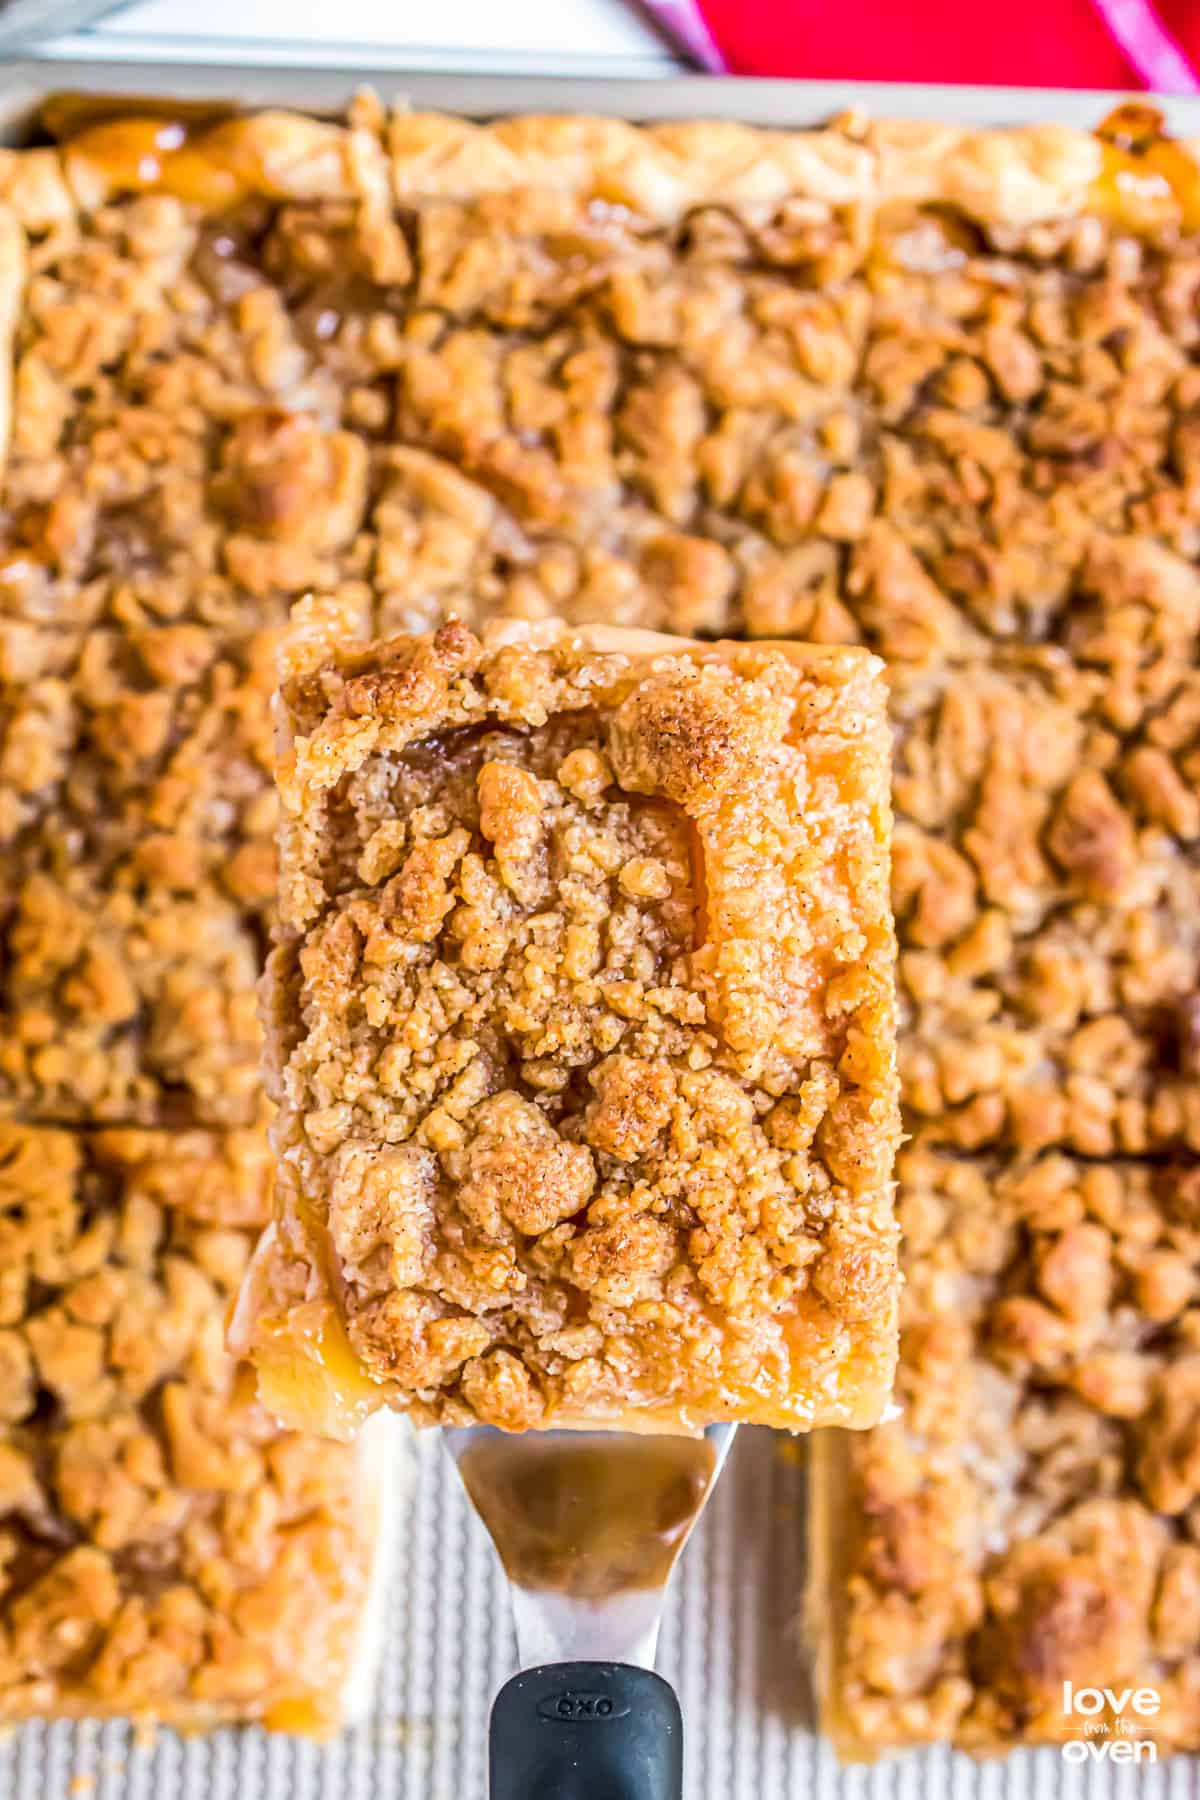
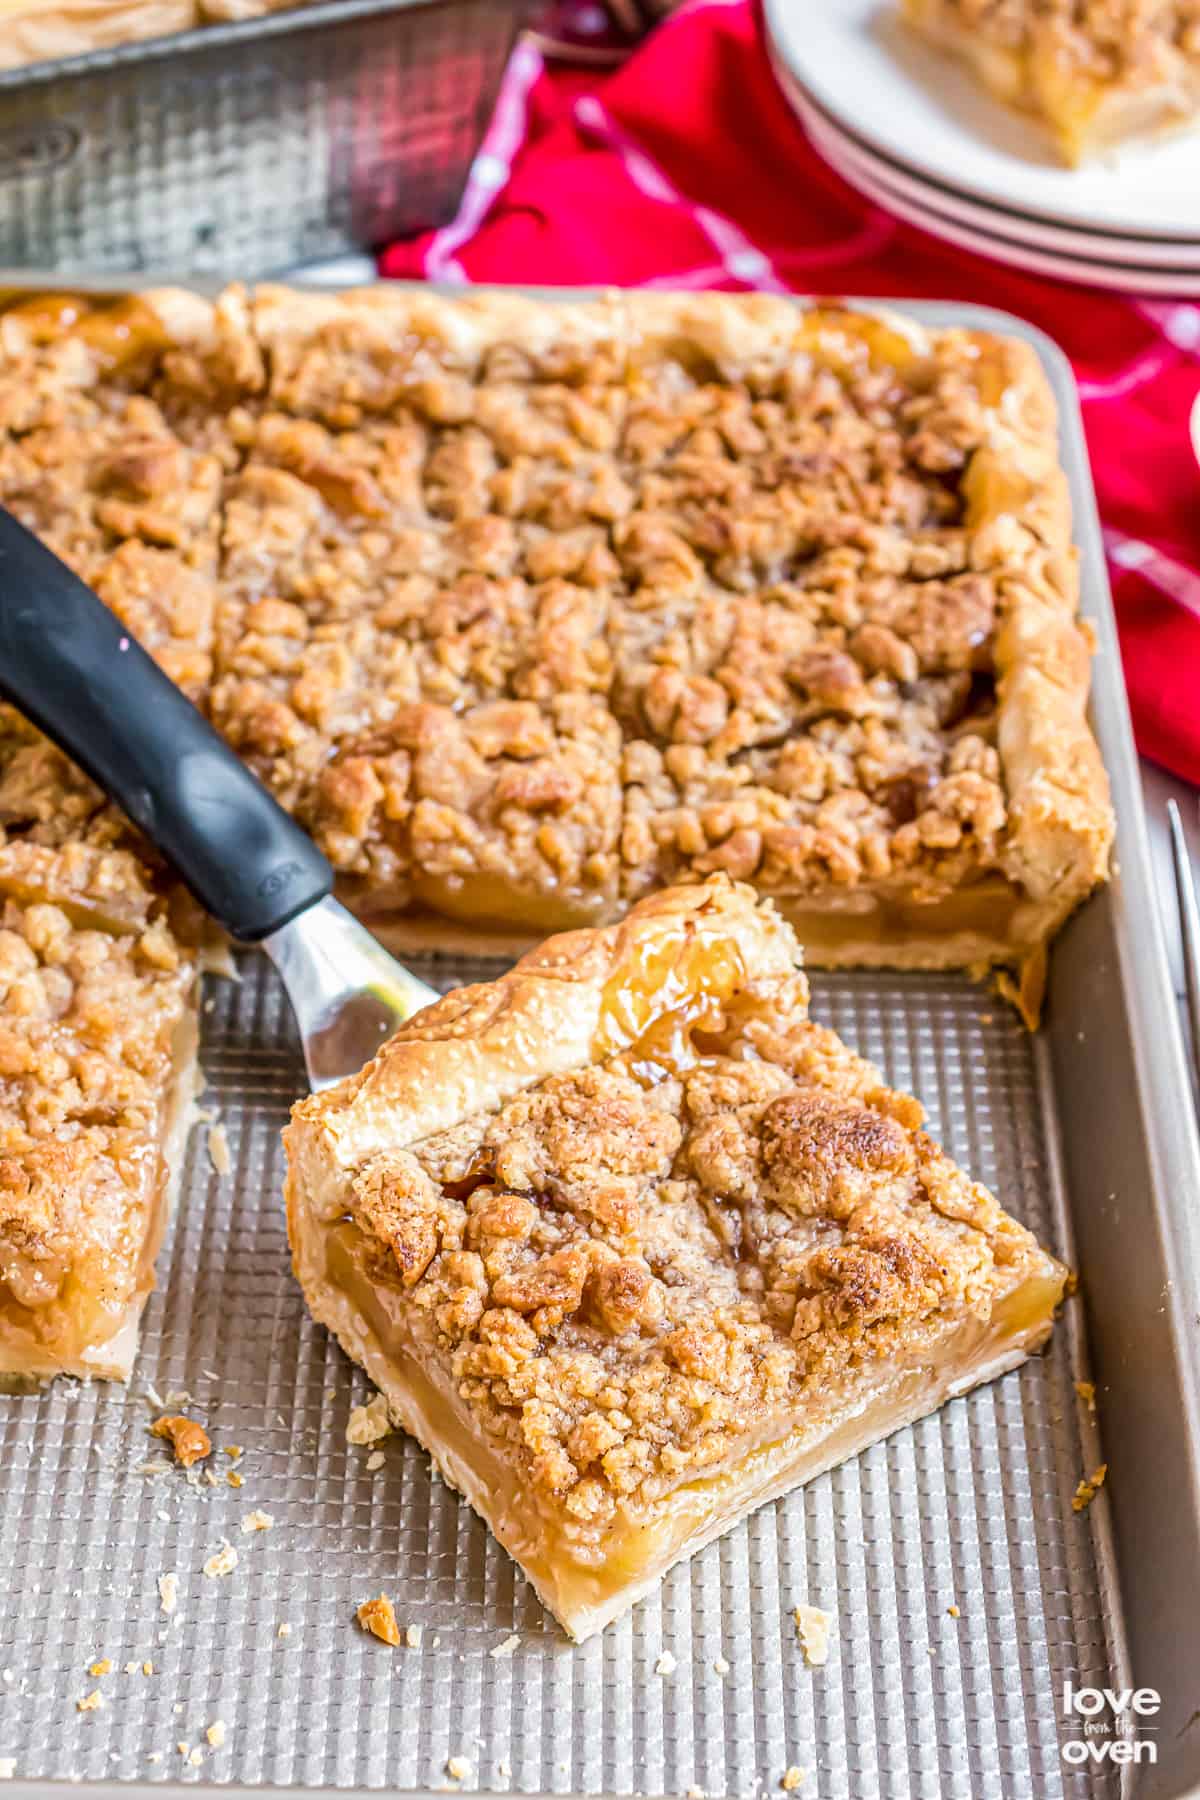
- Sprinkle the topping all over the Apple Slab Pie until it’s completely covered and bake for about 45 minutes, or until the top of the apple pie turns a golden brown.
- Serve it warm or at room temperature with your favorite toppings and enjoy!
Recipe Tips and Advice
No Soggy Bottoms – To help prevent a soggy bottom crust typical in many fruit-filled pies, we’ve moved the rack to the lower third of the oven.
Storage – Lightly cover the Apple Slab Pie with aluminum foil and keep it at room temperature for about 2 days or in the fridge for about 5 days.
Freezing – You may also freeze this by wrapping the pie in plastic wrap or foil tightly and sticking it in a freezer bag before storing in the freezer for about 3 months. When reheating, allow it to thaw until it reaches room temperature.
Equipment – For this apple pie with canned filling recipe you’ll need a 9”x13” quarter sized baking sheet, a fairly large rolling pin, some mixing bowls and an optional pastry blender. You can use a different size baking sheet like a 10” x 15”, however you may need to lower the baking time.
Pro Pie Tips
If you see your pie starting to brown too quickly in the oven, gently add a piece of foil over the top of it until the pie finishes baking. You don’t want to take the pie out too soon, or else the center will be undercooked.
I recommend placing a baking tray underneath the baking dish to catch any spillage from the pie filling that may flow over in the oven.
Recipe FAQs
You can cut this apple slab pie into 16 pieces instead of 12 and it will still be filling enough for everyone to enjoy.
If you’re using the apple pie filling you buy in cans at the store, there is no need to cook them before adding them to the pie crust. If you are making a homemade filling you may need to cook it beforehand depending on the recipe.
While this may be the case for some apple pie recipes, there is no need to do that for this one.
More Recipes To Try
Apple Pie Toppings
Wondering what to serve with apple pie? Here are a few of my favorite toppings!
- Whipped Cream – Any type of whipped cream is great, but we especially love cinnamon whipped cream!
- Vanilla Ice Cream – You can’t go wrong with a classic apple pie a la mode situation!
- Caramel Sauce – I love a drizzle of Caramel Sauce on every slice of apple slab pie!
Apple Recipes You’ll Love
If you enjoyed this Apple Slab Pie with canned filling recipe, you’ll love these apple recipes as well!
- Caramel Apple Pie
- Dutch Apple Pie
- Apple Pie Cheesecake Bars
- Baked Cinnamon Apples
- Campfire Apple Pie Packets
- Apple Crisp
- Chocolate Covered Apples
- Mini Caramel Apple Cheesecakes
- Apple Cobbler
- Caramel Apple Cake

Apple Slab Pie
Equipment
- 9×13 baking sheet
Ingredients
- 2 refrigerated pie crusts (thawed according to package directions)
- 42 ounces canned apple pie filling (this is two standard size cans of pie filling)
- 1 cup all purpose flour
- 1/2 cup brown sugar (measured packed)
- 1/2 teaspoon nutmeg
- 1/2 teaspoon cinnamon
- 1/2 cup unsalted butter (cold)
Instructions
- Preheat the oven to 400°F. Move the oven rack to the lower third of the oven.
- Lightly flour a work surface. Unroll two thawed pie crusts and stack them on top of each other. Roll the dough to about a 17” x 14” rectangle using a large rolling pin.
- Transfer the dough to a quarter sheet pan and press the crust into the corners of the pan, allowing the excess dough to hang over the edges.
- Roll the crust edges toward the center of the pan to create an edge. Using an overturned spoon, make a decorative indentation.
- Pour two cans of pie filling into the pie crust.
- In a medium mixing bowl, combine flour, brown sugar, nutmeg, and cinnamon.
- Cut the cold butter into cubes and add to the mixing bowl. Using your hands or a pastry blender, combine ingredients to form a crumbly texture.
- Sprinkle the topping evenly over the apple pie filling.
- Bake for about 45 minutes or until the crust is brown and the filling is bubbly. 11. Serve warm or at room temperature.
Notes
Nutrition
The nutrition facts provided are calculated using a third-party tool and are estimates only. Actual nutritional content may vary based on the ingredients and brands you use, as well as portion sizes. For accurate results, please consult a registered dietitian or nutritionist.
Email This Recipe

Meet Christi, Love From The Oven
I’m Christi I love sharing easy & delicious recipes that your family & friends will love. I’m a mom, baker, cookbook author and lover of sprinkles.


This recipe is easy! Great tasting too. I did only make it into a 9″ square pan, because there only the two of us. It worked out good. 1 pie crust, my own filling recipe, and 1/2 the rest of the recipe. It baked up smelling the whole house wonderful!
It worked out great-not a weeks worth of leftovers that we don’t need in this house-hubby is on a diet for health reasons, but still gets some sweets.
I usually cut dessert recipes in 1/2 and they work out good. Your recipes are great!
I made this for Fathers Day , sugar free version and it was perfect! Everyone loved it, very delicious!
Happy to hear!
Why two pie crusts needed on top of each other? Can just one crust be used? What needs to be done differently if only one crust is used?
A single pie crust is not enough for a 9×13″ pan.
Can I ask how deep was your pan? I was going to double this in a large jelly roll pan.